This week has been an interesting week. There has been a ton of discussion about babies, which lead to my first obsession and then I stumbled upon my second obsession as I was blog searching. The first obsession is courtesy of Layla Grace. This website has the most beautiful (and expensive) things for babies. I fell in love with several of the bedding sets and wondered if they sold the same sets for adult beds. The second obsession is Cupcakes Take the Cake. This website is all about cupcakes and every singly post is dedicated to what's going on in the cupcake world and, let me tell you, there are some amazing cupcake makers out there. Go check them out!

Saturday, July 19, 2008


Thursday, July 17, 2008

Cookie Carnival: Raspberry Almond Bars

It's that time of the month again...Cookie Carnival time! I was so excited when I saw the cookie recipe that was chosen for this month because I was going to be trying something new: making curd. I have never made curd and, to be honest, I didn't even know what curd was. Whenever I heard "curd" I always thought it had something to do with milk since, you know, milk curdles.And usually when my milk curdles, it's not a good thing for my taste buds or my nose. But when you are using fruit to make curd, there's no way that can be bad for the senses. The original cookie recipe that was chosen was for Blackberry Almond Bars, but since I couldn't find blackberries anywhere I went with raspberries. The raspberries were a good replacement because the taste was phenomenal and I fell in love with the color combination of the gold shortbread and mauve curd. This cookie is so delicious that I ate nearly half of what I made (which was half of the recipe) and I definitely recommend others try this simple and healthy (it has fruit in it, alright?) dessert.

Raspberry Almond Bars
Source: Williams-Sonoma
Ingredients
12 Tbs. (1 1/2 sticks) chilled unsalted butter, cut into 1-inch pieces
2 cups all-purpose flour
1/2 cup ground toasted almonds
1/2 cup granulated sugar
1/2 tsp. salt
For the raspberry curd:
2 pints raspberries
4 eggs
1 1/2 cups granulated sugar
Pinch of salt
1 Tbs. fresh lemon juice
4 Tbs. (1/2 stick) unsalted butter, at room temperature, cut into 1-inch pieces
Confectioners’ sugar for dusting
Preheat an oven to 350°F. Lightly butter a 9-by-13-by-2-inch cake pan.

In the top pan of a double boiler or in a nonreactive saucepan, whisk together the eggs and granulated sugar until blended. Then whisk in the raspberry juice, salt and lemon juice. Set the top pan over but not touching simmering water in the bottom pan, or set the saucepan over medium-low heat. (If using a saucepan, take care not to heat the mixture too quickly.) Cook, stirring constantly with a wooden spatula or spoon, until the mixture is warmed through, 1 to 2 minutes.
Begin adding the butter a little at a time, stirring each addition until blended before adding more. Continue cooking, stirring constantly and scraping the bottom of the pan, until a finger drawn across the back of the spatula leaves a path, 8 to 10 minutes more. Immediately remove the pan from the heat. Pass the curd through the chinois set over a bowl and let stand for 10 minutes. Whisk to blend, then pour the curd over the shortbread, spreading it evenly to the edges.

Bake until the curd is set, about 30 minutes. Transfer the pan to a wire rack and let cool completely. Cut into individual bars, cover and refrigerate until ready to serve. Dust the bars with confectioners’ sugar before serving.

Makes 20 bars.

Close-up of yummy goodness.

Enjoy!
Wednesday, July 16, 2008
Goals for the Year
Spending lots of time at home lately has my mind going. If I'm not eating, sleeping, walking Perla, or discussing life with my friends on Gmail, I'm thinking. It's like my brain is in overdrive thinking about the upcoming year. Now for me, "upcoming year" doesn't refer to your standard year of January to December. Since we are officially a household of two students, "upcoming year" has been redefined to mean August to May. Come August I will be embarking on a whole new journey and throwing myself wholly into the pursuit of a legal education. It's scary, yet exciting at the same time. I've come to wonder if this will be the end of my schooling or if I'll be left wanting more of something else. In May of next year, the shackles of schooling will finally be removed from Alex's tired and strained brain and then he'll be thrown into the realities and complexities of the working world. But even more life-changing is the news we'll receive in 245 days. In 245 days we'll know what the next 5 years of our lives will look like: will we stay in Boston or will we move elsewhere? It's the outcome of this day that has my brain going and thinking about what I'd like to accomplish this upcoming year. I don't want to say that I lived in Boston for 4 years and didn't experience northern and New England living to the fullest. With that in mind I have created a "must do" list for August to May:
-Go to a Red Sox game: I've dealt with hearing the crowd every night the Sox are in town, so why not be a part of that roaring crowd?
-Go apple picking: I've never picked any kind of fruit and I think picking apples would be awesome. Apple pie anyone? DONE!
-See Nutcracker: Dropping hints each year has not worked (for once, why can't a woman be subtle and have a man pick up on it?), so this year I am determined to go, even if it is on my own. DONE!
-Go on a Duck Tour: I just want to, ok?
-Go on the Ghosts & Gravesides tour: The gravesides throughout the city must be crawling with interesting stories and I'm ready to hear them.
-Do the Freedom Trail: I know Boston history in it's broadest terms, I'd like to know more.
-Go to Cape Cod and Martha's Vineyard: I want to see what all the hype's about.
-Go skiing: The last time I went skiing was sometime in the 80s and that's quickly becoming a fleeting memory.
-Visit the surrounding states: Only problem...I have no idea what to do in the surrounding states. I need help!
If you have any recommendations about things a New Englander must do, please let me know. I'm open to suggestions :)
Here's to a year of discovering, experiencing, and enjoying New England living.

Autumn Colors


-Go to a Red Sox game: I've dealt with hearing the crowd every night the Sox are in town, so why not be a part of that roaring crowd?
-Go apple picking: I've never picked any kind of fruit and I think picking apples would be awesome. Apple pie anyone? DONE!
-See Nutcracker: Dropping hints each year has not worked (for once, why can't a woman be subtle and have a man pick up on it?), so this year I am determined to go, even if it is on my own. DONE!
-Go on a Duck Tour: I just want to, ok?
-Go on the Ghosts & Gravesides tour: The gravesides throughout the city must be crawling with interesting stories and I'm ready to hear them.
-Do the Freedom Trail: I know Boston history in it's broadest terms, I'd like to know more.
-Go to Cape Cod and Martha's Vineyard: I want to see what all the hype's about.
-Go skiing: The last time I went skiing was sometime in the 80s and that's quickly becoming a fleeting memory.
-Visit the surrounding states: Only problem...I have no idea what to do in the surrounding states. I need help!
If you have any recommendations about things a New Englander must do, please let me know. I'm open to suggestions :)
Here's to a year of discovering, experiencing, and enjoying New England living.
Summer Swans

Autumn Colors

Winter Snowmen

Spring Tulips

Tuesday, July 15, 2008
TWD: Chocolate Pudding

Make sure to go to the TWD website to read about everyone else's feelings about pudding!
Before and After.


Scooping in...


Saturday, July 12, 2008
I'm a winner!
Thanks Joelen!

Friday, July 11, 2008
Bundt Madness.

Earlier this week I had a craving for a bundt cake swimming in icing. I don't know where the craving come from but it somehow etched itself into my brain. My senses were going crazy as I thought of the tastes and smells of a bundt cake. I felt like a dessert addict who needed a fix of cakey, sugary goodness. Like the mad baker that I am I went through all my cookbooks in search of just the recipe that would satisfy my craving. I came across one such recipe and luckily enough I had all the supplies I needed to make the bundt cake. I was even more excited to see that the recipe called for blueberries because it makes this cake all the more perfect for the summer.
Everything about this recipe tasted great. I had a feeling it would be good because I seriously contemplated licking the bowl clean versus actually cleaning it just so that I could eat the leftover batter. Once the cake cake out it did not disappoint. The tartness of the lemon and the sweetness of the blueberry were a perfect match.
Sour Cream-Blueberry Cake
Source: Williams-Sonoma's Desserts
For the cake
3 cups unbleached all-purpose flour
1 Tbsp baking powder
1/2 tsp salt
6 Tbsp unsalted butter, at room temperature
1 1/3 cups granulated sugar
2 large eggs
2 tsp vanilla extract
1 tsp grated lemon zest
1/4 cup sour cream
3/4 cup whole milk
2 cups fresh or frozen blueberries
Confectioner's sugar icing flavored with lemon (see below)
Preheat the oven to 350 degrees. Butter a 2 1/2 quart Bundt pan.
In a large bowl, sift together the flour, baking powder, and salt. Set aside. In another bowl, using an electric mixer set on medium-high speed, beat the butter until light and fluffy. Add the sugar and beat until blended. Add the eggs, one at a time, beating well after each addition. Beat in the vanilla and lemon zest. Beat in the sour cream. Reduce the speed to low and, dividing the flour mixture into 3 batches, beat the flour mixture into the butter mixture alternately with the milk, beginning and ending with the flour mixture. Beat just until combined. The batter will be very thick.
Spoon half of the batter into the prepared pan. Sprinkle with 1 cup of blueberries. Gently press the berries into the batter. Spoon the remaining batter over the berries and then sprinkle the remaining berries over the top, again pressing them gently into the batter.

Bake until a toothpick inserted near the center comes out clean, about 1 hour. Transfer to a wire rack and let cool in the pan for 10 minutes. Invert onto the rack and let cool completely.


Transfer the cake to a plate. Drizzle the icing evenly over the top, allowing it to run slightly over the sides. Serve immediately, or cover with a cake dome or store at room temperature for up to 1 day.
Lemon flavored icing
1/4 unsalted butter
1 Tbsp fresh lemon juice
1/2 tsp lemon zest
1/2 cup confectioner's sugar
In a small saucepan over meium heat, stir together the butter and the lemon juice until the butter melts. Remove from the heat and let stand until cool, about 5 minutes.
Combine the lemon zest and the sugar and then add to the butter mixture and whisk vigorously until completely smooth and thickened, about 1 minute. Use within 5 minutes, or the icing may become too thick to drizzle. If the icing does become too thick, rewarm it for 2-3 seconds over low heat, whisking constantly until it loosens.
My artistic shot of the day.

For you...

Slices need a tan too...

...And they need company!

Enjoy!
Wednesday, July 9, 2008
Where It All Began.
Growing up I never had a passion or even an interest in cooking. I was an occasional baker and a frequent dishwasher (doing the dishes meant I didn't have to cook). My mom would try to get me to cook with her, but I refused because I believed I would be the type of women who had a husband who'd cook for her (who's the joke on now?!). I avoided cooking with all my might. Heck, I even had my sister, who's 4 years younger than me, cook for me. There was no getting me in the kitchen.
My feminist take on cooking changed the moment I started living on my own some 5 years ago. It dawned on me that if I wanted to live for longer than a month I would actually have to learn how to make myself food (unfortunately, you can't survive solely on than peanut butter and jelly sandwiches). So I started cooking. Not great cooking, but at least I was in the kitchen. And to my surprise, I actually enjoyed it. It wasn't until we moved to Boston some 3 years ago that I really started cooking. And by really cooking, I mean making good food and enjoying making good food. It was at this time that it dawned on me that if Alex and I were going to survive longer than a week I was going to have to get creative in the kitchen (sadly enough, you can't survive solely on mac & cheese). My love for food was born during the initial months in Boston and it has only flourished as I have pushed myself to new limits and as I have forced myself to explore food outside of my comfort zone of Cuban and Colombian dishes. I now can see why my mom tried to get me to cook when I was younger: it's because she enjoyed cooking and took pride in the food she made. It took me a while to understand this because I saw cooking as something that repressed women. Today I know that cooking (and baking) can be so liberating and exciting. Cooking has become something I truly enjoy and I don't think I would have ever gotten here if it weren't for my mom's amazing food. Thanks mom for introducing me to the real meaning of cooking!


My feminist take on cooking changed the moment I started living on my own some 5 years ago. It dawned on me that if I wanted to live for longer than a month I would actually have to learn how to make myself food (unfortunately, you can't survive solely on than peanut butter and jelly sandwiches). So I started cooking. Not great cooking, but at least I was in the kitchen. And to my surprise, I actually enjoyed it. It wasn't until we moved to Boston some 3 years ago that I really started cooking. And by really cooking, I mean making good food and enjoying making good food. It was at this time that it dawned on me that if Alex and I were going to survive longer than a week I was going to have to get creative in the kitchen (sadly enough, you can't survive solely on mac & cheese). My love for food was born during the initial months in Boston and it has only flourished as I have pushed myself to new limits and as I have forced myself to explore food outside of my comfort zone of Cuban and Colombian dishes. I now can see why my mom tried to get me to cook when I was younger: it's because she enjoyed cooking and took pride in the food she made. It took me a while to understand this because I saw cooking as something that repressed women. Today I know that cooking (and baking) can be so liberating and exciting. Cooking has become something I truly enjoy and I don't think I would have ever gotten here if it weren't for my mom's amazing food. Thanks mom for introducing me to the real meaning of cooking!

One of my mom's famous dishes: churrasco marinated in beer,
arroz con gandules, and grilled platanos.
arroz con gandules, and grilled platanos.

Tuesday, July 8, 2008
TWD: Blueberry Pie

I tried the pie and didn't love it. I thought it was good but not great. Something about the filling was a little off to me. I've never had blueberry pie before (although Alex has offered me some in the past) so I have no idea if this is a good pie or not. I'm going to have to wait for Alex to get home so that he can tell me if this pie compares to others he's had. I hope it does and that it's better than the other pies!
Thanks to Amy of South in Your Mouth for this week's selection!
Pretty, sugary berries.


Before and after the bake.


The berries look so snug :)

I just like these pictures.


Pac Man pie returns!

Peanut Butter Yum
As soon as I saw the recipe for Peanut Butter Ice Cream on Milk & Honey's blog I knew I had to make this ice cream. I thought Alex would propose to me all over again because I made him something with peanut butter in it. Why would he propose again, you ask? Because I am weird. I am not a fan of peanut butter in any kind of dessert. I can sit and eat a whole tub of peanut butter on its own but the moment you put it in a dessert I won't touch it. I just don't like the taste. So for me to make this ice cream was a real treat because it means Alex did something special to deserve it. And he did do something special...he got good grades in school! I swear I treat the man like a little kid sometimes. However, if you would have seen his expression when he tried this ice cream you would have thought he was a little kid because he loved it so much :)

Peanut Butter Chocolate Chip Ice Cream
Source: Bruce Weinstein's The Ultimate Ice Cream Book (here)
Ingredients
3/4 cup sugar
3 large eggs
1 cup milk
1/2 cup creamy peanut butter
1 1/2 cups heavy cream
2 tsps. vanilla extract
1/2 cup miniature chocolate chips
Directions
In a medium mixing bowl, beat the sugar into the eggs until thickened and pale yellow. Set aside.
Bring the milk to a simmer in a heavy medium saucepan. Slow beat the hot milk into the eggs and sugar. Pour the entire mixture back into the pan and place over low heat. Stire constantly with a whisk or wooden spoon until the custard thickens slightly. Be careful not to let the mixture boil or the eggs will scramble. Remove from the heat and beat in the peanut butter. Pour the hot custard through a strainer into a large, clean bowl. Allow the peanut butter custard to cool slightly. Stir in the cream and vanilla. Cover and refigerate until cold or overnight.
Stir the chilled custard, then freeze in your ice cream machine according to the instructions. Add chocolate chips when ice cream is semi-frozen. Allow the machine to mix in the chips. Transfer ice cream to a freezer-safe container and freeze at least two hours.
With some chocolate chip cookies..yum!


Sunday, June 29, 2008
Daring Bakers: Danish Bread

Enjoy!
DANISH DOUGH
Source: Sherry Yard's The Secrets of Baking
Makes 2-1/2 pounds dough
Ingredients
For the dough (Detrempe)
1 ounce fresh yeast or 1 tablespoon active dry yeast
1/2 cup whole milk
1/3 cup sugar
Zest of 1 orange, finely grated
3/4 teaspoon ground cardamom
1-1/2 teaspoons vanilla extract
1/2 vanilla bean, split and scraped
2 large eggs, chilled
1/4 cup fresh orange juice
3-1/4 cups all-purpose flour
1 teaspoon salt
For the butter block (Beurrage)
1/2 pound (2 sticks) cold unsalted butter
1/4 cup all-purpose flour
DOUGH
Combine yeast and milk in the bowl of a mixer fitted with the paddle attachment and mix on low speed. Slowly add sugar, orange zest, cardamom, vanilla extract, vanilla seeds, eggs, and orange juice. Mix well. Change to the dough hook and add the salt with the flour, 1 cup at a time, increasing speed to medium as the flour is incorporated. Knead the dough for about 5 minutes, or until smooth. You may need to add a little more flour if it is sticky. Transfer dough to a lightly floured baking sheet and cover with plastic wrap. Refrigerate for 30 minutes.
Without a standing mixer: Combine yeast and milk in a bowl with a hand mixer on low speed or a whisk. Add sugar, orange zest, cardamom, vanilla extract, vanilla seeds, eggs, and orange juice and mix well. Sift flour and salt on your working surface and make a fountain. Make sure that the “walls” of your fountain are thick and even. Pour the liquid in the middle of the fountain. With your fingertips, mix the liquid and the flour starting from the middle of the fountain, slowly working towards the edges. When the ingredients have been incorporated start kneading the dough with the heel of your hands until it becomes smooth and easy to work with, around 5 to 7 minutes. You might need to add more flour if the dough is sticky.
BUTTER BLOCK
1. Combine butter and flour in the bowl of a mixer fitted with a paddle attachment and beat on medium speed for 1 minute. Scrape down the sides of the bowl and the paddle and then beat for 1 minute more, or until smooth and lump free. Set aside at room temperature.
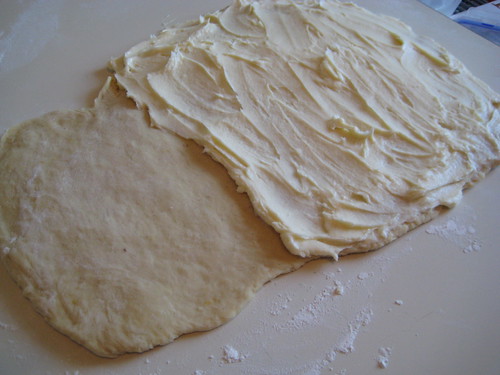
2. After the detrempe has chilled 30 minutes, turn it out onto a lightly floured surface. Roll the dough into a rectangle approximately 18 x 13 inches and 1⁄4 inch thick. The dough may be sticky, so keep dusting it lightly with flour. Spread the butter evenly over the center and right thirds of the dough. Fold the left edge of the detrempe to the right, covering half of the butter. Fold the right third of the rectangle over the center third. The first turn has now been completed. Mark the dough by poking it with your finger to keep track of your turns, or use a sticky and keep a tally. Place the dough on a baking sheet, wrap it in plastic wrap, and refrigerate for 30 minutes.
3. Place the dough lengthwise on a floured work surface. The open ends should be to your right and left. Roll the dough into another approximately 13 x 18 inch, 1⁄4-inch-thick rectangle. Again, fold the left third of the rectangle over the center third and the right third over the center third. No additional butter will be added as it is already in the dough. The second turn has now been completed. Refrigerate the dough for 30 minutes.
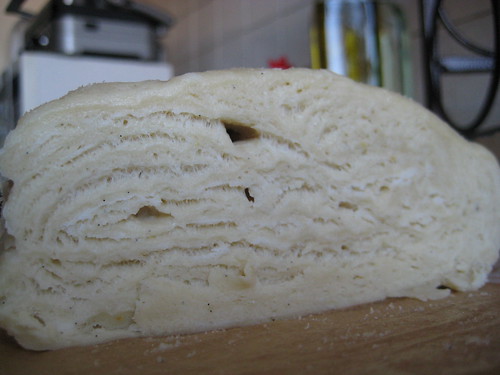
4. Roll out, turn, and refrigerate the dough two more times, for a total of four single turns. Make sure you are keeping track of your turns. Refrigerate the dough after the final turn for at least 5 hours or overnight. The Danish dough is now ready to be used. If you will not be using the dough within 24 hours, freeze it. To do this, roll the dough out to about 1 inch in thickness, wrap tightly in plastic wrap, and freeze. Defrost the dough slowly in the refrigerator for easiest handling. Danish dough will keep in the freezer for up to 1 month.
APPLE FILLING
Makes enough for two braids
Ingredients
4 Fuji or other apples, peeled, cored, and cut into 1⁄4-inch pieces
1/2 cup sugar
1 tsp. ground cinnamon
1/2 vanilla bean, split and scraped
1/4 cup fresh lemon juice
4 tablespoons unsalted butter
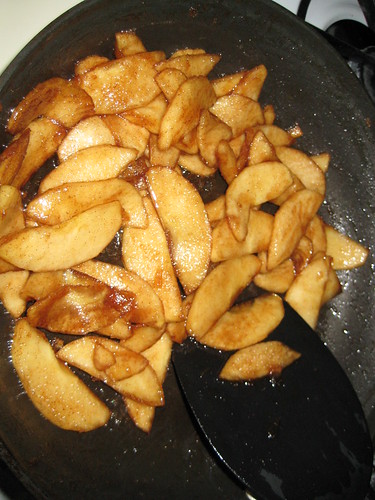
Toss all ingredients except butter in a large bowl. Melt the butter in a sauté pan over medium heat until slightly nutty in color, about 6 - 8 minutes. Then add the apple mixture and sauté until apples are softened and caramelized, 10 to 15 minutes. If you’ve chosen Fujis, the apples will be caramelized, but have still retained their shape. Pour the cooked apples onto a baking sheet to cool completely before forming the braid. (If making ahead, cool to room temperature, seal, and refrigerate.) They will cool faster when spread in a thin layer over the surface of the sheet. After they have cooled, the filling can be stored in the refrigerator for up to 3 days. Left over filling can be used as an ice cream topping, for muffins, cheesecake, or other pastries.
DANISH BRAID
Makes enough for 2 large braids
Ingredients
1 recipe Danish Dough (see above)
2 cups apple filling, jam, or preserves (see above)
For the egg wash: 1 large egg, plus 1 large egg yolk
1. Line a baking sheet with a silicone mat or parchment paper. On a lightly floured surface, roll the Danish Dough into a 15 x 20-inch rectangle, 1⁄4 inch thick. If the dough seems elastic and shrinks back when rolled, let it rest for a few minutes, then roll again. Place the dough on the baking sheet.
2. Along one long side of the pastry make parallel, 5-inch-long cuts with a knife or rolling pastry wheel, each about 1 inch apart. Repeat on the opposite side, making sure to line up the cuts with those you’ve already made.
3. Spoon the filling you’ve chosen to fill your braid down the center of the rectangle. Starting with the top and bottom “flaps”, fold the top flap down over the filling to cover. Next, fold the bottom “flap” up to cover filling. This helps keep the braid neat and helps to hold in the filling. Now begin folding the cut side strips of dough over the filling, alternating first left, then right, left, right, until finished. Trim any excess dough and tuck in the ends.

Egg Wash
Whisk together the whole egg and yolk in a bowl and with a pastry brush, lightly coat the braid.
Proofing and Baking
1. Spray cooking oil (Pam…) onto a piece of plastic wrap, and place over the braid. Proof at room temperature or, if possible, in a controlled 90 degree F environment for about 2 hours, or until doubled in volume and light to the touch.
2. Near the end of proofing, preheat oven to 400 degrees F. Position a rack in the center of the oven.
3. Bake for 10 minutes, then rotate the pan so that the side of the braid previously in the back of the oven is now in the front. Lower the oven temperature to 350 degrees F, and bake about 15-20 minutes more, or until golden brown. Cool and serve the braid either still warm from the oven or at room temperature. The cooled braid can be wrapped airtight and stored in the refrigerator for up to 2 days, or freeze for 1 month.
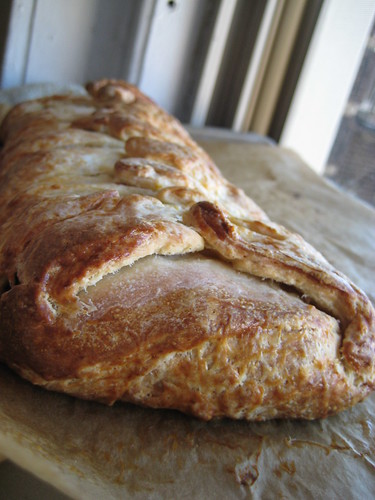
Finished bread without the braiding.
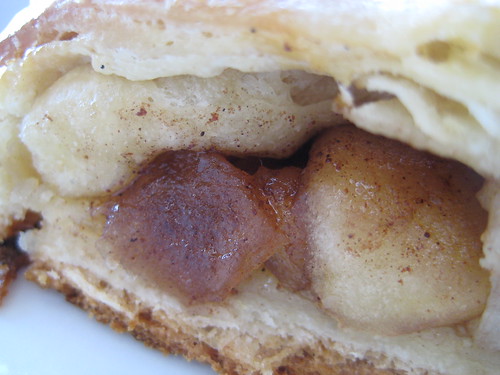
A fresh slice and close-up of apples.

Subscribe to:
Posts (Atom)