Showing posts with label Chocolate. Show all posts

Friday, June 27, 2014

Vote for my post on Mom Blog Network

Easy Chocolate Mousse

 
The majority of our things are on their way to Chicago. It's hard to believe that the time is nearing for our big move up north. It's even harder for me to believe that this is the second big interstate move in five years and third in nine years. First it was Boston and now it's Chicago; I'm starting to think the north really wants us.

One of the frustrating things about this move has been having to plan what goes, what stays, and what we can live without for two weeks. A lot of my kitchen things went up so I am left having to be creative and making recipes that don't require much kitchen equipment. This recipe for Chocolate Mousse fits that bill perfectly as it doesn't require baking and the ingredients are minimal. The best part is that it comes together quickly and tastes amazing.

 
Easy Chocolate Mousse
Source: WonkyWonderful
Serves 4

16 oz cold heavy cream
2 Tablespoon powdered sugar
1½ cup semi-sweet chocolate chips

Melt chocolate chips in the microwave, stopping every 30 seconds to stir. Once the chocolate is melted, set aside to cool slightly.

Whip the heavy cream in your stand mixer using the whisk attachment until it thickens and peaks appear.

Add the powdered sugar and melted chocolate. Whip for another 30 seconds or until the mousse is thick and fully blended.

Transfer to serving dishes. Garnish with whipped cream or chocolate shavings. Serve and enjoy.

Note: the Mousse can also be refrigerated and served later.
Follow me on Facebook and Instagram @thecookierunner 
Stephanie

Tuesday, April 1, 2014

Vote for my post on Mom Blog Network

Celebrate April with Chocolate Mayonnaise Cake

It's April! I'm happy it's April because it's my birthday month. I'm so excited about turning 30 that I am going to be celebrating each day this month with one of my favorite foods or drinks (follow along on my Facebook page). I made a list of my favorites and almost half of the list has chocolate as an ingredient. I never realized how much of a chocolate lover I was until I made this list. To celebrate, I'm sharing one of my favorite chocolate cake recipes. I first made this recipe back in January of 2012, but a good recipe is always worth sharing multiple times. This time around, I made a cake and topped it with fudge frosting and sprinkles.


Chocolate Mayonnaise Cupcakes
Source: Jill O'Connor's Sticky, Chewy, Messy, Gooey
Half of this recipe yields 1-8x8 cake

2 cups bleached all-purpose flour
3/4 cups cocoa powder
1 tsp baking soda
1/4 tsp salt
2 cups sugar
2 large eggs
1 cup mayonnaise (not low-fat)
2 tsp pure vanilla extract
1 1/3 cups boiling water

Position a rack in the middle of the oven and preheat to 350 degrees F. Butter and flour baking pan and set aside. 

In a large bowl, sift together the flour, cocoa powder, baking soda, and salt. Set aside.

In another bowl, combine the sugar and eggs and beat with an electric mixer set at medium-high speed until light and fluffy, about 2 minutes. Beat in mayonnaise and vanilla just until combined. Reduce the speed to medium and beat in half of the flour mixture just until combined. Stop the mixer and scrape down the sides of the bowl. Add half of the boiling water and beat at a very low speed just until the batter is smooth, 5 to 10 seconds. Add the remaining flour mixture and beat just until combined, 5 to 10 seconds longer. Beat in the remaining water. The batter will be somewhat thin.

Pour the batter into the cake pan. Bake until a wooden skewer inserted into the center of the cake comes out clean, 30-40 minutes. Remove from oven and let cool completely. Frost once the cake has cooled. 

Fudge Icing
Source: Jill O'Connor's Sticky, Chewy, Messy, Gooey

1/4 cup semi-sweet chocolate chips
1/4 cup unsalted butter
2 Tbsp buttermilk
1/2 tsp vanilla extract
Pinch of salt
1 1/2 to 2 cups powdered sugar

Combine the chocolate, butter, and buttermilk in a saucepan and cook, stirring over medium heat, until the chocolate is melted. 

Remove from heat and whisk in vanilla, salt, and 1 1/2 cups powdered sugar. 

Add remaining sugar if you like a sweeter and thicker icing. 

Frost cake, serve, and enjoy.

Follow me on Facebook and Instagram @thecookierunner
Stephanie

Tuesday, February 18, 2014

Vote for my post on Mom Blog Network

Happy Snacker: No-Bake Granola Protein Bites

I'm a snacker. Actually, I'm a huge snacker. I'm also one of those people who eats when she gets bored so it's really important that I have healthy snacks made and ready to eat. One of my favorite snacks has to be this recipe for No-Bake Granola Protein Bites. I came across the recipe one day when I was searching for recipes that contained oats and chocolate chips. I immediately made the recipe and added a few extra goodies to it to really made it something I could enjoy. The best part is that these healthy snacks are seen as dessert by my girls. If you like peanut butter and chocolate, then you will definitely like this recipe. If you like not feeling guilty about the snack you are eating, then this recipe is definitely for you. 

No-Bake Granola Protein Bites 
Source: Slightly adapted from Mel's Kitchen Cafe
Yields about 18 bites

1 cups quick oats
1/2 cup crispy rice cereal (I use Special K)
1 scoop (1/4 cup) vanilla protein powder
1/2 cup creamy peanut butter
1/2 cup ground flaxseed
1/4 chia seeds
1/2 cup dark chocolate chips, cut into chunks
1/3 cup honey or agave nectar
1 teaspoons pure vanilla extract
1 Tablespoons coconut oil

Combine all the ingredients together in a large bowl, being careful not to crush the cereal too much. Mix until well-combined. Add a tablespoon or so more of peanut butter if the mixture does not come together well.

Using a cookie scoop or your hands, drop rounded tablespoonful-sized portions onto a parchment or wax paper lined cooking sheet.

Refrigerate for 1-2 hours.

Star snacking!

Follow me on Facebook and Instagram! Instagram

Stephanie

Tuesday, December 24, 2013

Vote for my post on Mom Blog Network

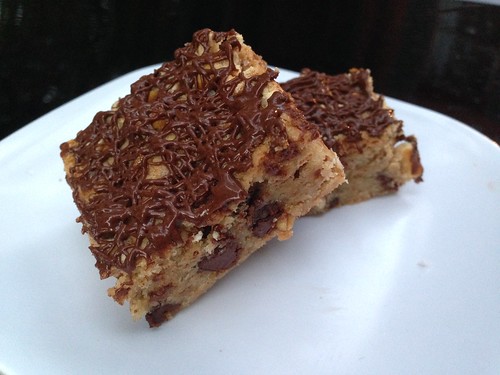
Pretzel Chocolate Chip Bars


This is my third post this month. Woo hoo! I've been off from school for almost three weeks and I'm starting to get back to what life was like before the craziness of this past semester. The biggest lesson I learned was that I needed to organize my life a little better by prioritizing and cutting back on things. I was doing too much and was spread too thin. I guess the best way to put it is that I made myself too available and had a lot of trouble with saying no. Not a good thing when you are going to be a therapist and part of your job is to dive into the lives of others and help them come up with more effective boundaries! Next semester will be different and I think I have done a better job at consolidating things so I'm hoping that these small changes will have big effects at home. I'm sure the girls will love having me around more and will love having me be less distracted all the time.

To celebrate the end of the semester and the little bit of downtime I have before school starts again, I made these Pretzel Chocolate Chip Bars. I found this recipe after doing a quick "pretzel chocolate chip cookies" search and I am never letting it go. The sweetness, saltiness, crunchiness, really just everything about this recipe was great. I'm a chocolate chip cookie lover by nature so my expectations for these bars were a little high and I am happy they did not disappoint. I had to keep these hidden from the girls just so that I didn't have to share.


Pretzel Chocolate Chip Bars
Source: Just A Taste
Yields: 16 bars

1 cup (2 sticks) unsalted butter, melted
1 cup packed light brown sugar
1/2 cup sugar
2 large eggs
1 1/2 teaspoons pure vanilla extract
2 cups all-purpose flour
1 teaspoon salt
1 1/2 cups chocolate chips, divided
1 cup crushed salted pretzels, divided
2 teaspoons vegetable oil

Preheat the oven to 350ºF.

Line an 8-inch square baking pan with parchment paper, allowing it to hang over two sides. Coat with cooking spray.

In a large bowl using a hand mixer, mix together the melted butter and the sugars until smooth, about 2 minutes. Add the eggs and vanilla and mix until combined

Slowly mix in the flour and salt just until incorporated. Stir in 1 cup of chocolate chips and 1/2 cup of crushed pretzels.

Pour the batter into the prepared pan, smoothing the top before sprinkling the remaining 1/2 cup of crushed pretzels on top.

Bake for about 30 until a toothpick inserted comes out clean. Remove the cookie bars from the oven and allow them to cool completely in the pan. Once cooled, remove the cookies using the parchment paper overhang.

While the cookie bars are cooling, melt the remaining 1/2 cup chocolate chips with the vegetable oil in in the microwave, heating for 20 seconds at a time until melted.

Drizzle the cookie bars with the melted chocolate and allow them to cool until the melted chocolate hardens. (I poured the chocolate into a ziplock bag and piped them onto the bars)

Cut the cookie bars into 16 squares. Serve and enjoy!
Follow me on Facebook and Instagram! Instagram

Stephanie

Wednesday, December 18, 2013

Vote for my post on Mom Blog Network

Late for the Holidays: Homemade Hot Cocoa Mix


I started my Christmas shopping last Friday. This is a first for me. I am usually very on top of things and done with all of my holiday shopping the first week of December. Considering the first week of December coincided with the end of the semester and the finishing of some of my programs at my internship site, I guess I shouldn't be surprised that I am this behind. The worst part is that I am so stumped when it comes to what to get people. Last year I made this Homemade Hot Cocoa Mix and handed it out to the teachers at Cati's school and I'm doing the same this year. Except, I'm thinking I will be handing these out to family and friends with a note attached that says "IOU a more thought out, personalized gift."

Homemade Hot Cocoa Mix
Source: Slightly adapted from Brown Eyed Baker
Yields 20 servings

3 cups nonfat dry milk powder
2 cups powdered sugar
1½ cups cocoa powder
1½ cups chopped milk chocolate chips (or any other variety of chocolate)
¼ teaspoon salt

Whisk together all ingredients in a large bowl. Working in two batches, pulse the ingredients in a food processor until the chocolate is finely ground. Store in an airtight container for up to 3 months.

To make hot cocoa, put 1/3 cup of the cocoa mix in a mug and stir in 1 cup of hot milk. Top with whipped cream or miniature marshmallows.
Follow me on Instagram! Instagram

Stephanie

Friday, November 22, 2013

Vote for my post on Mom Blog Network

Salted Caramel Chocolate Chip Cookies

Around Halloween Target had caramel squares on sale. I bought them. I didn't know what I was going to do with them but I figured I would find something. After a particularly stressful day this week, I asked the family what they wanted me to bake them and they all said, "cookies." I decided I would find a recipe using caramel squares and make them cookies. Imagine my happiness when I found a caramel chocolate chip cookie recipe. I love chocolate chip cookies! These cookies were simply amazing. Everyone loved them and you could tell right off the bat they had caramel in them. Cati has already requested that I make them again!

Salted Caramel Chocolate Chip Cookies 
Source: Two Peas and Their Pod
Yields: 3 dozen cookies

2 cups all-purpose flour
2 teaspoons cornstarch
1 teaspoon baking soda
1/2 teaspoon sea salt
3/4 cup unsalted butter, at room temperature
1 cup brown sugar
1/4 cup granulated sugar
1 large egg
2 teaspoons vanilla extract
1 cup semi-sweet chocolate chips
1/2 cup Kraft Caramel Bits (or chopped up caramel squares)
Sea salt, for sprinkling on cookies

Preheat oven to 350 F. Line a large baking sheet with a Silpat baking mat or parchment paper and set aside.

In a large bowl, whisk flour, cornstarch, baking soda and sea salt together. Set aside.

In the bowl of a stand mixer, cream together butter and sugars until smooth and creamy, about 3 minutes. Add egg and vanilla extract and beat until combined. Slowly mix in the dry ingredients.

Stir in the chocolate chips and caramel bits. Form cookie dough into tablespoon balls and place on prepared baking sheet, about 2 inches apart. Sprinkle each cookie with sea salt.

Bake cookies for 10 minutes, or until slightly golden brown around the edges. Let the cookies cool on the baking sheet for two minutes. Transfer to a wire cooling rack and cool completely.
Follow me on Instagram! Instagram

Stephanie

Tuesday, September 24, 2013

Vote for my post on Mom Blog Network

Pumpkin Week: Pumpkin Bread


Last week I was wishing for fall. I was wishing for it so much that I spent the whole week baking with pumpkin. I went from being the girl who thought she didn't like pumpkin to the girl who loves pumpkin. I still don't like pumpkin pie but I think it's more a texture thing at this point. I started off the week with a Pumpkin Bread that looked more like a cake because of the pans I had on hand. I also I added chocolate chips to the batter because everything is better with chocolate. What I loved the most of this recipe was how simple it was and how quickly it came together. Also, this was my first time baking with olive oil. I have always avoided recipes with olive oil because I thought it would give the dessert a weird taste, but it didn't. Lesson learned!


Pumpkin Bread
Source: Simply Recipes
Yields two small loaves

  • 3/4 cup whole wheat flour
  • 1/4 teaspoon of salt
  • 1/2 cup sugar
  • 1/2 teaspoon baking soda
  • 1/2 cup  pumpkin purée
  • 1/4 cup olive oil
  • 1 egg, beaten
  • 2 Tbsp water
  • 1/4 teaspoon nutmeg
  • 1/4 teaspoon cinnamon
  • 1/4 teaspoon allspice
  • 1/4 cup chocolate chips

Preheat oven to 350°F (180°C). Spray two small pans with cooking oil. 

Sift together the flour, salt, sugar, and baking soda.
Mix the pumpkin, oil, egg, 2 Tbsp water, and spices together, then combine with the dry ingredients, but do not mix too thoroughly.
Bake about 30 minutes or until a thin skewer poked in the very center of the loaf comes out clean. Remove from over and let cool. 
Follow me on Instagram! Instagram

Stephanie

Sunday, September 1, 2013

Vote for my post on Mom Blog Network

Easy Peasy Fudge


I have been so dedicated to exercising and eating healthy that it feels as if it has been a very long time since I used granulated sugar and white flour in my kitchen. I remember the days when it felt weird not to have butter, eggs, sugar, or flour always in stock. When they say that "being healthy is a lifestyle" they aren't lying. I guess I was able to get away with that in the summer because I was just taking classes and staying home with the girls and going on our daily adventures. But once school started again two weeks ago, along with also starting my internship and getting ready for both girls to start school, I have been feeling that need to get back into the kitchen to bake. It's not even about eating what I bake; it's about getting in touch with that relaxed and happy feeling I get when I do bake.

So this weekend we stocked up on all the baking essential and I asked Cati what she wanted me to bake her and she, surprisingly, said "brownies." We have a song for cookies and cupcakes so I was expecting one of those two, but I was more than happy to make her some brownies. I made my go-to brownies and really kicked it up a notch by also make a fudge sauce. This sauce is truly amazing and could you really doubt a recipe that came from Smitten Kitchen? It was so easy to make and everyone in the house was eating it like it was their job. Because this was a dessert Cati requested, no dessert is complete without sprinkles.


Hot Fudge Sauce
Source: Smitten Kitchen
Yields 2 1/2 cups

4 ounces unsweetened chocolate
3 tablespoons butter, unsalted
2/3 cup water
1/3 cup sugar
6 tablespoons corn syrup
Pinch of salt

Melt the chocolate and butter very slowly in a double boiler or in the microwave, stirring frequently until combined.

Meanwhile, heat the water to boiling in the small, heavy saucepan.

When the butter and chocolate have melted, stir the mixture into the boiling water. Add the sugar, corn syrup and salt and mix until smooth.

Turn the heat up and stir until mixture starts to boil; adjust heat so that sauce is just maintained at the boiling point, stirring occasionally. Allow sauce to boil for nine minutes (mine was good to go after about 5-6 minutes).

Remove from heat and cool for 15 minutes.

PS although the blog is quiet, there's lots of pictures on Instagram (@confessionscityeater)! 

Stephanie

Tuesday, August 6, 2013

Vote for my post on Mom Blog Network

Dessert Quesadillas

Dessert Quesadilla
Little by little I have been making changes to the way we eat in our house. You're more likely to find whole wheat products in our house now and my pantry is full of foods like chia seeds, quinoa, and flaxseed. If we are all going to be working out and staying active, then our diets should change to reflect a healthier lifestyle. My Achilles heal, however, is and will always be desserts.  I have this need for desserts after dinner and I have yet to figure out what to eat as a dessert that won't tempt me into eating 10 of it. Luckily, it seems like I may have found a dessert that can do the trick every now and then. These Dessert Quesadillas are easy and quick to make and completely kid-friendly. They were just the right amount of sweet that I needed and one slice was good enough to satisfy my sweet craving.

By the way, I'm on Instagram now if you want to follow me there!

Dessert Quesadillas 
Source: How Sweet It Is

2 whole wheat tortillas
1 tablespoon butter
2 teaspoons cinnamon
2 tablespoons natural peanut butter
2 tablespoons chocolate chips

Spread butter on one side of each tortillas and sprinkle with cinnamon. Heat a skillet on medium heat, spray with cooking spray and crisp until golden brown. While still warm, spread one tortilla (cinnamon side up) with peanut butter and top with chocolate chips. Place other tortilla on top.

Serve and enjoy!
Stephanie

Thursday, October 25, 2012

Vote for my post on Mom Blog Network

Salted Caramel Chocolate Shortbread Bars

IMG_0775
I have so many recipes and things to share but it's been so hard for me to find the motivation. I think I finally have the overwhelmed feeling under control; or at least I don't feel as anxious as I used to whenever I start feeling overwhelmed. I'm overwhelmed but I know I can get it all done if I take a step back and prioritize. Everything is about balance and finding the right balance for you. And if you are like me and you need help in the balancing department, I suggest making these Salted Caramel Chocolate Shortbread Bars. Three layers of sweet goodness and one happy face after eating a bar.

Salted Caramel Chocolate Shortbread Bars
Source: Tracey's Culinary Adventures adapted from Annie's Eats

Shortbread
2 cups all-purpose flour
2 teaspoons baking powder
1/4 teaspoon salt
1 cup (2 sticks) unsalted butter, at room temperature
1/2 cup sugar

Caramel
1/2 cup (1 stick) unsalted butter, cut into 8 pieces
1/2 cup sugar
2 tablespoons light corn syrup
1 14-oz can sweetened condensed milk

Chocolate
8 oz chocolate, finely chopped (I used bittersweet)
1 teaspoon light corn syrup
1/2 cup (1 stick) unsalted butter, cut into 8 pieces
Fleur de sel for sprinkling (optional)

Preheat oven to 325 F. Line a 9x13-inch baking pan with parchment paper.

To make the shortbread layer: Whisk the flour, baking powder and salt together in a medium bowl. In the bowl of a stand mixer fitted with the paddle attachment, beat the butter and sugar on medium speed until well combined, about 2 minutes. With the mixer on low, gradually add the dry ingredients and beat just until combined. Transfer the dough to the prepared pan and press into an even layer over the bottom (it'll be a fairly thin layer). Bake for 15-18 minutes, or until the crust is golden brown. Transfer the pan to a wire rack and cool completely.

To make the caramel layer: Combine the butter, sugar, corn syrup and sweetened condensed milk in a medium saucepan. Set the pan over medium heat. Stir occasionally until the butter is melted. Increase the heat to medium-high, and bring the mixture to a boil. Reduce the heat to medium-low and simmer, whisking constantly, until the mixture thickens and turns a light caramel color. This may take 10 minutes or more, so be patient. Pour the caramel mixture over the cooled shortbread and spread in an even layer. Allow to cool completely, then chill briefly (I stuck mine in the fridge overnight, but you just want to chill enough that it won't melt when you add the warm chocolate in the next step).

To make the chocolate layer: Add the chocolate, corn syrup, and butter to a heatproof bowl and set over a pan of simmering water. Heat, stirring occasionally, until everything is melted and the mixture is smooth and glossy. Pour the chocolate over the chilled caramel and spread into an even layer with an offset spatula. Let cool for a few minutes, then sprinkle the top with the fleur de sel (if using). Let the chocolate set completely before slicing and serving.
Stephanie

Thursday, December 22, 2011

Vote for my post on Mom Blog Network

Chocolate Nutella Fudge with Sea Salt

Chocolate Nutella & Sea Salt Fudge
This Chocolate Nutella Fudge with Sea Salt is the other fudge I made in addition to the chocolate peppermint fudge I posted about yesterday. Like I said in yesterday's post, I found this one harder to work with because the fudge started melting as I was cutting it. I let it sit in the fridge overnight so I don't know what happened. At least, it's a really tasty bit of fudge and it is ridiculously creamy.

Chocolate Nutella Fudge with Sea Salt
Source: Cookin' Canuck

Butter, for greasing pan
1 (14 oz. ) can sweetened condensed milk
1 tsp vanilla extract
8 oz. high-quality bittersweet (60% cacao) chocolate chips
1 cup Nutella, room temperature
3 tbsp unsalted butter, room temperature, cut into 1/2-inch pieces
Sea salt, approximately 1/2 tsp

Grease the bottom and sides of an 8- by 8-inch baking pan with butter. Line the pan with parchment paper, leaving a 2-inch overlap on the sides.

In a medium glass or stainless steel bowl, stir together sweetened condensed milk, vanilla, bittersweet chocolate chips, Nutella, and butter.

Form a double-boiler by setting the bowl on a medium pot of gently simmering water. The water level should be low enough that the bottom of the bowl does not touch the water. Stir until the chocolate chips are melted and the mixture is smooth, 5 to 7 minutes.

Scrape the mixture into the prepared pan, spread the top smooth with a spatula, and sprinkle with sea salt. Refrigerate until the fudge is firm, at least 2 hours.

Run a knife under hot water, dry it off, and run it around the edges of the pan to loosen the fudge. Using the overhanging parchment paper, lift the fudge out. Peel off the parchment paper. Cut the fudge into 3/4-inch squares. Store in the refrigerator in an airtight container or wrapped well in plastic wrap and foil.

Makes approximately 50 3/4-inch squares.
Stephanie

Wednesday, December 21, 2011

Vote for my post on Mom Blog Network

Chocolate Peppermint Fudge

Chocolate Peppermint Fudge
I've been a little bit on a mad dash to get some holiday baking done before this weekend. I thought I would have more trouble getting things done with Cati at home this week, but she has been so helpful. She likes to pull the step ladder up to the counter and watch what I'm doing. Today she even helped me pour flour into the bowl! She'll be a little baker in no time!

One of the things that I made that I have been wanting to try is fudge. For some reason, I thought it would be difficult to make but it's actually pretty easy. You just need to act fast when moving the warm fudge into the pan. I made two types (second type coming tomorrow) and, of the two, this one was easier to work with and tasted more like the fudge that I'm used to getting at the store. This fudge is very chocolaty and, as is the case with fudge, I was all set with one slice. I topped mine with crushed candy canes to give it more of a holiday feel and that was enough to peppermint flavor to balance out of the chocolate flavor.

Chocolate Fudge
Source: Baked Bree
Yields about 30 2x2 squares

2 cups sugar
1 teaspoon salt
6 Tablespoons butter
1 cup cream
3 1/2 cups mini marshmallows
3 cups semisweet chocolate chips
1 teaspoon vanilla
sprinkles (optional)
crushed peppermint (optional)

Line an 8x8 pan with parchment paper or aluminum foil. Set aside.

Add the sugar, salt, butter, cream, and marshmallows to a large saucepan. Cook the mixture over medium heat until the marshmallows and butter begin to melt, about 5 minutes.

Once the marshmallows have melted, bring the mixture to a boil, and boil for 5 minutes. It will begin to brown and will bubble all over the place. Take the pan off of the heat.

Add the chocolate chips and vanilla.

Mix it all together until the chocolate has melted and everything is nice and smooth. Pour into prepared pan. Sprinkle with desired toppings and let sit at room temperature for 3 hours before you slice.
Stephanie

Tuesday, March 1, 2011

Vote for my post on Mom Blog Network

TWD: Chocolate Pots de Crème

Chocolate Pots de Crème
I couldn't resist the prospect of making an orange whipped cream to go with these Chocolate Pots de Crème. Something about the orange flavor really seemed to offer the luxurious taste I wanted for these already luxurious sounding and tasting chocolate sweets. A little bit of Cointreau (or Triple Sec) added to the heavy cream before beating did the trick and the desserts had a wonderful taste dynamic between the freshness of the citrus and the richness of the chocolate. Dorie describes the Chocolate Pots de Crème as a cousin to pudding and I agree in terms of technique, but when it comes to taste Alex and I both thought this dessert was closer to a mousse. However, that could be because I think I overcooked mine a bit. Oops, as usual.
Chocolate Pots de Crème
Thanks to Christine of BlackCatCooking for making such a great selection this week. Make sure to go to her blog for the recipe and to go to the TWD site to see what everyone else did this week.
Stephanie

Thursday, February 24, 2011

Vote for my post on Mom Blog Network

Chocolate Cupcake

Chocolate Cupcake
I recently discovered the best lighting in the house. The spot is perfect for flash-less pictures. Unfortunately, the spot happens to be in the family room, aka Cati's playroom. Usually she's distracted enough playing with her toys that she doesn't notice me, but this time she did. She was all about trying to get a piece of this chocolate cupcake. I don't blame her either. This is my favorite chocolate cupcake recipe because of how deeply chocolaty and incredibly moist it is. Because I have become an extreme chocolate lover in my adulthood I throw chocolate chips into the batter.
Chocolate Cupcake

One Bowl Chocolate Cupcakes
Source:
Makes 12 cupcakes
Chocolate Cupcakes
Source: Sticky, Chewy, Messy, Gooey
Yields 12 cupcakes

Cupcakes
1 1/2 cups all-purpose flour
1/2 cup firmly packed brown sugar
1/2 cup granulated sugar
1/4 cup cocoa powder
1 tsp baking soda
1/4 tsp salt
1 cup boiling water
1/3 cup vegetable oil
1 Tbsp apple cider vinegar
1 tsp vanilla extract

Chocolate Glaze
4 oz semisweet chocolate, finely chopped
6 Tbsp unsalted butter, cut into 6 pieces
2 Tbsp light corn syrup
1/2 tsp pure vanilla extract

Preheat oven to 350 degrees F. Line one standard 12-cup cupcake tins with paper cup liners.

In a large bowl, whisk together the flour, brown sugar, granulated sugar, cocoa powder, baking soda, and salt. In a 2-cup measuring cup, combine the boiling water, oil, vinegar, and vanilla. Make a well in the center of the dry ingredients and pour in the liquid ingredients. Stir together until smooth.

Fill each cupcake cup 3/4 full of batter. Divide it evenly and use it all. Bake cupcakes until puffed and firm, about 20 minutes.

Meanwhile, make the glaze. Combine all the ingredients in a microwave safe bowl and microwave on high for 45 seconds. Remove from microwave and stir until smooth. If the chocolate is not completed melted, continue to microwave for 20-second intervals and stir until smooth. Alternately, heat glaze ingredients in the top of a double boiler and stir until smooth.

Transfer the cupcakes in the pans to a wire rack and let cool completely. When cool, dip the top of each cupcake in the chocolate glaze (feel free to double dip). Let the excess glaze drip from the cupcakes for a few seconds and then place the cupcake right-side up on the wire rack until the glaze firms up before serving.

Enjoy!
Stephanie

Tuesday, February 15, 2011

Vote for my post on Mom Blog Network

Dessert Table Sweet: Easy Oreo Truffles

IMG_0100c
I want to wait until I get the professional pictures to show you all the party pictures but I don't want to wait until then to share the recipes for the desserts I made. Most of the recipes are my go-to recipes and have made their appearance on the blog before but I think it's time for a refresher. First up, was the overwhelming favorite of the day: Oreo Truffles. Everyone loved them and one of my friends even called me after the party asking for directions on how to make the truffles. If you haven't tried these truffles then I urge you to make them right this instance. They are simply divine and outrageously good.

It was for this dessert that I used the toppers Sarah (Aspire to Be) sent us. This made the dipping part so much easier and it really dressed up the truffles and added a nice visual touch to the dessert table.

Easy Oreo Truffles
Source: Kraft Recipes

1 pkg. (8 oz.) PHILADELPHIA Cream Cheese, softened
1 pkg. (16.6 oz.) OREO Cookies, finely crushed (about 4-1/4 cups), divided
2 pkg. (8 squares each) BAKER'S Semi-Sweet Chocolate, melted

Mix cream cheese and 3 cups cookie crumbs until well blended.

Shape into 48 (1-inch) balls. Dip in melted chocolate; place on waxed paper-covered baking sheet. Sprinkle with remaining cookie crumbs.

Refrigerate 1 hour or until firm. Store in tightly covered container in refrigerator.

Notes:
  • I mixed ALL the crumbs with the cream cheese and topped my truffles with pink edible balls.
  • I used about 5 oz of chocolate total for the dipping. When I made this in the past the chocolate was really hard to work with because it was very thick so this time around I made it more like a ganache by melting the chocolate with 2 Tbsp of butter and about a Tbsp of heavy cream. This made the chocolate a million times easier to work with and it helped the truffles get a more smooth and even coating.
Stephanie

Saturday, February 5, 2011

Vote for my post on Mom Blog Network

Nutella Panna Cotta

Nutella Panna Cotta
Oh Nutella, how do I love thee? Let me count the ways: I love to eat you on a spoon, on bread, with a banana, on my french toast, in brownies, and basically with anything and on everything. This chocolaty hazelnut spread is a real treat and perfect for satisfying the sweet tooth when regular chocolate won't do it.
I made this Nutella Panna Cotta recipe to celebrate World Nutella Day. I didn't get to participate in last year's celebration so I wanted to make sure to participate this year. I completely agree with World Nutella Day creators Sara of Ms Adventures in Italy and Michelle of Bleeding Espresso that Nutella is so amazing it deserves a day to itself. This panna cotta is so easy to make that it's reason enough for everyone to indulge in a little Nutella celebration today. It is creamy and silky and full of that hazelnut flavor that makes Nutella so amazing.
Nutella Panna Cotta

Nutella Panna Cotta
Source: Technicolor Kitchen
Serves 8

1 tablespoon powdered gelatin
1 cup Nutella
¼ teaspoon salt
1 ½ cups (360ml) heavy cream
½ teaspoon vanilla extract
1 cup (240ml) whole milk

In a medium bowl, whisk together the gelatin and 3 tablespoons cold water.

Put the Nutella and salt in a medium bowl and set aside.

In a medium saucepan, bring the cream and vanilla to a boil. Pour 1/3 of the hot cream mixture over the gelatin and whisk it well. Then pour the gelatin mixture back into the remaining cream.

Pour about 1/3 of the cream mixture over the Nutella. Whisk well to form a smooth paste. Add the remaining cream mixture and whisk well to combine. Whisk in the milk.

Strain the mixture through a fine sieve into a bowl, then divide it among eight ramekins, glasses or cups. Refrigerate until set, about 3 hours – the panna cotta can be kept, loosely covered with plastic wrap, in the refrigerator for up to 2 days.

They can be served in the ramekins or dipped in hot water and unmolded onto a serving plate.
Stephanie