Showing posts with label Fruit. Show all posts

Wednesday, August 13, 2014

Vote for my post on Mom Blog Network

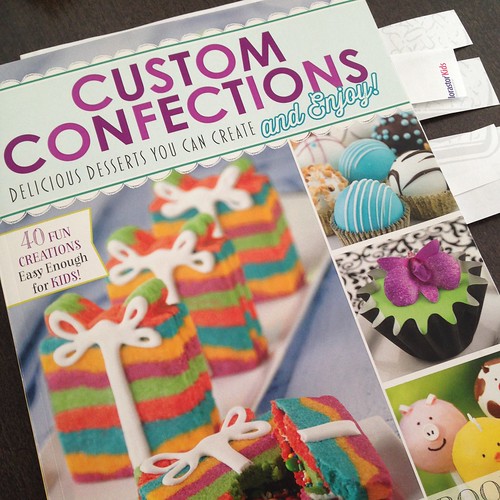
Book Review: Jen Besel's Custom Confections

I was sent a copy of Jen Besel's book, Custom Confections: Delicious Desserts You Can Create and Enjoy, to review and, as usual, I am thankful for any reason to bake. Part of what really had me excited about the book was that it claimed to have recipes that were easy enough for kids. Now that my girls are older, especially Cati at almost 4.5 years old, they are very interested in everything that I do in the kitchen and are constantly asking to help add and mix ingredients. As soon as Cati saw the book she grabbed it, sat down, and started leafing through the pages. Right off the bat, the book's cover is eye-catching and I can't blame Cati for being immediately drawn to it.
The meaning behind the name, Custom Confections comes from Besel's view that everyone can make custom desserts. With this view, Besel has developed recipes with easy-to-find ingredients, short prep time, and shortcuts to creating showstopping desserts. The book is divided into five sections and includes recipes for everything from cakes to cookies to bars to popsicles to frosting. Like a good cookbook (or at least my favorite ones), there s a conversion chart and a list of tools that not only are useful for a fully stocked kitchen, but also for making the recipes in Custom Confections.

Aesthetically, the book is gorgeous to look at with pictures for every single recipe and fun colors and fonts. For the majority of the recipes you can lay the book flat on the counter and have the picture on one side and the recipe on the other. For someone who has baked as much as I have, it's always been a bit of a pet peeve when recipes are pages long and I have to flip back and forth to check the ingredient list and see where it matches up with the directions. Besel gives a one-sentence intro/commentary to every dessert, making you want to try every single dessert.

The only issue I had with the book was that the serving amount wasn't identified or clear. This is an issue for me because I usually cut recipes down so we don't have too many sweets in the house at a given time.

As part of my review I picked five recipes from the book. Recipes were chosen based on what I thought the family would like, tools I had, ease of making, and involvement of kids. The five recipes were Molten Caramel Cake, PB & J Cheesecake Brownies, Stained Glass Cookies, Stuffed Strawberries, and Ooey, Gooey Turtle Cake.

Molten Caramel Cake

Eight ingredients, 10 steps, and about 20-25 minutes from prep to table. Cati was able to help with unwrapping the caramel candies, adding them to the batter, and sprinkling with sea salt. This recipe was, by far, the favorite for everyone in the family. I baked for 12 minutes, but my cakes (4) could have used an extra minute or two in the oven. The leftover cake was put in the fridge and reheated the next day and tasted just as good as it did fresh out of the oven. This dessert is perfect for the chocolate lover and I loved that sea salt was added as caramel-sea salt is one of my favorite combinations. I've made molten cakes before and, while they are one of my favorite desserts, I rarely make them because the recipes I have tried before have been too involved. This recipe solves that problem for me and now molten cakes will be a dessert that I make more frequently.

PB & J Cheesecake Brownies

Nine ingredients, eight steps, and at least 40 minutes from prep to table. Instead of making an 8x8 pan of brownies, I made 12 brownie cups, quartered the cream cheese recipe, and added PB & J to half of the cups so that I could get a good taste of the finished cheesecake (plus, I'm not a fan of peanut butter in desserts). I also added a chocolate drizzle to the cups to make them look even prettier. The cups baked for 25 minutes and neither of the girls helped with the prep work for this dessert. The finished dessert was a hit and it was hard to get the girls to only have one for dessert. The brownie portion is made from a mix, but the cheesecake is made from scratch and, when baked, the cheesecake was smooth and didn't crack when cooled! The only thing I would change about this recipe is heating up the jam before putting it in the cheesecake mixture so that it mixes easier.
 

Stained Glass Cookies

Four ingredients, eight steps, and about 25 minutes from prep to table. This recipe was probably the funnest one for the girls as they got to unwrap the candies, help break them up into small pieces, place them in the hole of the cookie, and decorate their own cookies. They even sat in front of the oven, looking in to watch the candy melt. Once the cookies were out of the oven I was surprised by how hard the candies were! For some reason, I thought the candies would melt and become more pliable, but once cooled, the melted candy became hard again. My mistake with this recipe was thinking I had cookie cutters when I went to buy the ingredients and not actually checking to see if I did so my cookies did not end up with the wide opening I would have wanted. 

Stuffed Strawberries

Five ingredients, eight steps, and about 20 minutes from prep to table. I made half the filling recipe and had enough filling to "stuff" a dozen small- and medium-sized strawberries. The girls helped with this recipe by eating the cut-off tips. The finished product was so beautiful that it was almost a shame to eat. But eat them we did, and I am so happy we did because the strawberries were delicious and I fell in love with the tart-tangy-sweet combination. We ate all the stuffed strawberries in one sitting so I would call this recipe a complete success.
 
Ooey, Gooey Turtle Cake 

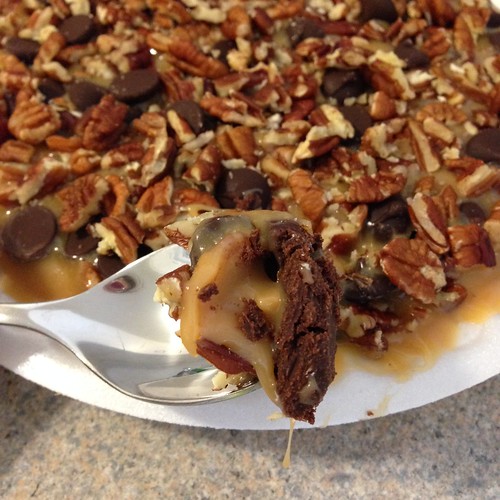
Five ingredients, nine steps, 10 minutes prep, and a torturous four hours to table. I made half the recipe and refrigerated the cake to expedite the process. The girls helped with unwrapping the caramel candies and sprinkling the cake with the pecans. I will warn you now, this dessert is completely addictive and incredibly dangerous. This was the simplest of the recipes I tried and, along with the Stuffed Strawberries, one of the recipes that I think best exemplifies Besel's efforts at creating easy-to-make custom desserts.
Custom Confections: Delicious Desserts You Can Create and Enjoy by Jen Besel will be available for purchase September 1st, 2014 for $12.95 USD ($14.95 CAD).

A copy of this book was provided to me by IWPR and the publisher, Capstone Young Readers, free of charge. The views and opinions in this review, however, are my own.

For more on my baking adventures follow me on Facebook and Instagram @thecookierunner
Stephanie

Sunday, June 2, 2013

Vote for my post on Mom Blog Network

Whole Wheat Banana Bread

banana bread3
We're in a bit of a transition period in my household. I'm slowly trying to get us all to eat healthier and am transitioning us to more whole grain-based products. The girls have been great about eating things made from whole grain, but Alex has been the difficult one. Things with whole grain taste "healthy" to him and, thus, don't excite him as much. Take this Whole Wheat Banana Bread, for example. I said I was going to make banana bread and his response was "Ooohhhh!!" But when I followed-up with, "it's going to be a whole wheat banana bread," his response turned to "oohhh...?" The excitement was gone. It also doesn't help that he seems to have this superhero power of detecting when something is made with "healthy" ingredients so he can taste when I've secretly switched out ingredients to make something healthier. Regardless, I went ahead and made this bread and it turned out to be a huge success. The girls loved it and Alex ate it without any "but it tastes healthy" comments.

Whole Wheat Banana Bread
Source: Breadtopia


½ cup (1 stick) unsalted butter
½ cup packed light or dark brown sugar
¾ teaspoon baking soda
½ teaspoon salt
1 teaspoon vanilla extract
1 ½ cups mashed ripe banana (3-4 medium to large bananas)
¼ cup honey 
2 large eggs
2 cups whole wheat flour, traditional or white whole wheat 

Preheat oven to 350 F degrees. Lightly grease a 9 x 5 inch loaf pan.

Beat together the butter, sugar, baking soda, salt, and vanilla in a medium bowl until smooth. Add the banana, honey and eggs, beating until smooth. Add the flour, stirring until smooth.

Spoon the batter into the prepared pan and bake the bread for 50 minutes. Lay a piece of foil gently across the top and bake until a cake tester (like a toothpick) inserted into the center comes out clean, 10 to 15 minutes more.

Remove the bread from the oven and allow it to cool for 10 minutes before turning it out of the pan onto a rack to cool completely.

Enjoy with a glass of milk. Yum!

Stephanie

Wednesday, August 22, 2012

Vote for my post on Mom Blog Network

Fig and Walnut Loaf

IMG_9615
Back when we lived in Boston we went to a restaurant called Sel de la Terre. I don't remember much about our meal there but I do remember the bread, especially the fig bread. We both loved the bread so much that when we went to Boston last year we went to the restaurant to see if we could buy a loaf of it. Unfortunately, they didn't have it but that's ok now that I have this recipe. If you like figs you will like this bread. Even if you don't like figs, you will still like this bread. This is the type of bread you will want to share because you'd want others to experience the awesomeness of figs.

Fig and Walnut Loaf 
Source: Kitchen Daily on Huffington Post

3/4 cup coarsely chopped walnuts (3 oz)
1/2 cup boiling water
6 ounces dried Turkish figs, coarsely chopped, (1 cup)
1 1/2 cups all purpose flour
1/2 cup sugar
1 teaspoon baking powder
1/2 teaspoon baking soda
1/2 teaspoon salt
1 large egg
1/4 cup vegetable oil
1/4 cup whole milk

Preheat oven to 350°F with rack in middle. Lightly butter and flour a 9 by 5-inch loaf pan.

Toast nuts in oven until a shade darker, about 10 minutes.

Pour boiling water over figs and let stand 10 minutes. Strain through a sieve reserving figs and liquid separately.

Stir together flour, sugar, baking powder, baking soda, and salt in a medium bowl. In a small bowl, stir together 1/4 cup of fig liquid, egg, oil, and milk. Stir wet ingredients into flour mixture until just combined, then stir in figs and walnuts.

Spread dough evenly in loaf pan and bake until a wooden pick inserted into center comes out clean, 1 to 1 1/4 hours. Cool bread in pan 15 minutes then turn out onto rack and cool completely.

Bread, wrapped well, at room temperature 1 week.
Stephanie

Thursday, June 14, 2012

Vote for my post on Mom Blog Network

Boozy Strawberry Shortcake for Two

IMG_8694
Did you know today is National Strawberry Shortcake Day? Well, it is and I'm celebrating with this messy concoction. I had a lot of fun creating this recipe and even more fun putting it all together. I'm not a strawberry fan but I loved the biscuit cookie because it was sweet and buttery and I loved the whipped cream because of its strawberry-orange liqueur flavor.

Boozy Strawberry Shortcake for Two
Serves 2

For the strawberries
5-6 strawberries, hulled and sliced
1 Tbsp sugar
2 Tbsp cointreau

In a small bowl combine all ingredients. Let sit for at least 30 minutes.

For the whipped cream
1/2 cup heavy cream
2 Tbsp liquid from strawberries
Combine ingredients in a small bowl. With a hand mixer on medium speed, mix until cream holds stiff peaks, 2-3 min.

For the biscuit cookies
1/2 cup flour
3/4 tsp baking powder
1/4 tsp salt
2 Tbsp sugar
3 Tbsp butter, chilled and cut into 6 pieces
1/4 cup heavy cream

Preheat oven to 350 degrees F.

Combine flour, baking powder, salt, and sugar in a bowl. Add butter and, using your fingers, mix until just incorporated and mixture looks like wet sand. With a fork stir in heavy cream until combined.
Let the dough sit for five minutes and then, on a floured surface, knead the dough until it hold together.
Divide the dough evenly in two, shape into circles, and pat them down until they are about 1/2-inch thick.

Bake for 15 to 20 minutes or until risen and golden in color. Remove from oven and allow to cool to room temperature.

Assembly
Lay one cookie on a plate. Layer with 2-3 Tbsp whipped cream, half of the berries, and 2-3 Tbsp whipped cream. Place the second cookie on top and garnish top with more whipped cream and the rest of the strawberries.
Stephanie

Saturday, February 4, 2012

Vote for my post on Mom Blog Network

Caramel Apple Gooey Bars

IMG_6186
This dessert is a simple adaptation to another recipe I have made before, but the results from the adaptation are beyond words. I can't even begin to express to you how much the small act of adding apples to these bars turned these already amazing bars to incredible bars. I promise you will not regret making these.

Gooey Caramel Butter Bars
 Source: Jill O'Connor's Sticky, Chewy, Messy, Gooey
Makes 12-2x2 squares

1 stick butter (8 Tbsp), at room temperature
1/4 cup granulated sugar
1/4 cup plus 2 Tbsp powdered sugar
1 tsp vanilla extract
1/4 tsp salt
1 cup unbleached all-purpose flour
3 apples, cored and thinly sliced (I used granny smith)
2 Tbsp mixed with 3/4 tsp cinnamon
Caramel sauce (recipe below)

Preheat oven to 325 degrees F. Line an 8x8 brownie pan with aluminum foil and coat with cooking spray.

In a large bowl, combine the butter and sugars. Beat until creamy. Add vanilla and salt and combine. Add flour and beat on low speed until combined (dough will be sandy).

Press about 1/2 the dough evenly into the pan to form a bottom crust. Place the remaining dough in the refrigerator.

Bake until firm and the edges are a pale golden color, about 20 minutes. Meanwhile, mix together the apples and cinnamon-sugar in a small bowl and make the caramel sauce. Remove the pan from oven and cool for 5 minutes.

Line with apples and top with half of caramel sauce. Crumble the rest of the refrigerated dough in top and return to oven. Bake until shortbread topping is firm and lightly golden, about 20-25 minutes. Transfer to a wire rack and cool completely.

Lifting foil, remove bars, place on a flat surface, and cut into even squares using a sharp knife.

Enjoy!

Storage: 1 week tightly covered at room temperature; 1 month in freezer.

Whiskey Caramel Sauce
Makes 1 cup

1 cup granulated sugar
1/4 cup whiskey
1/2 tsp lemon juice
1 cup heavy cream
1/4 tsp salt
1/2 Tbsp vanilla extract

Combine the sugar, whiskey, and lemon juice in a heavy bottom saucepan over medium heat. Cook, gently swirling the pan occasionally, until the sugar dissolves and starts to turn color. Increase the heat to high and boil until the syrup turns a deep amber color, 4 to 5 minutes. Watch carefully, as it can burn quickly.

Immediately remove the pan from the heat and pour in the cream and salt. Carefully stir in cream, as caramel has a tendency to hiss and splash as the cold cream hits it. Place pan over low heat and cook, stirring constantly, until caramel thickens, 5 to 7 minutes. The mixture should be the consistency of thick cream. Remove from heat and stir in the vanilla.

Let cool.
Stephanie

Friday, December 2, 2011

Vote for my post on Mom Blog Network

Apple Cake

Apple Cake
Like I've said before, I am really loving this fall season and find myself craving fall flavors. I dream of all things pumpkin and apple flavored and I would love it if my home smelled like cinnamon sugar baking. I came across this Apple Coffee Cake recipe recently and jumped on the chance to make it. I, however, left out the caramel sauce because I wanted something less sweet and truer to that apple flavor I was wanting. The cake itself was light but packed a flavorful punch thanks in part to the ginger and tart apples. Upon eating it, Alex first asked if I put ginger in the cake so a little goes a long way with this cake.
 Apple Cake
In general, this is a pretty cake to look at and a delicious one to snack on. I don't think the cake even lasted a day in our house.

Apple Coffee Cake
Source: The Baker Chick

1/4 cup melted butter

1/2 cup sugar
1/3 cup packed brown sugar
2 large eggs

1 tsp. vanilla
1 3/4 cup all-purpose flour, or some all-purpose, some whole wheat

2 tsp. cinnamon

1 tsp. ground ginger

1 1/2 tsp. baking powder
1/2 tsp. baking soda
1/4 tsp. salt
1 cup sour cream or plain yogurt
2-3 apples, unpeeled and sliced


Preheat oven to 350F. Spray a 10″ tube pan with nonstick spray.

In a large bowl, whisk together the butter and sugars until sandy. Mix in the eggs and vanilla until combined.

In a smaller bowl, whisk together the flour, cinnamon, ginger, baking powder, baking soda and salt. Add about a third to the butter mixture and whisk together just until blended. (as the batter gets thicker you may need to change to a wooden spoon.) Add half the sour cream, another third of the dry ingredients, the rest of the sour cream, and the rest of the dry ingredients, stirring by hand just until combined.

Arrange a layer of sliced apples onto the bottom of the pan. Scrape the batter into the pan on top of the apples. Add the rest of the apples onto the surface of the batter, arranging them however you like – they will shrink as they cook, so feel free to place them tightly together.
Stephanie

Saturday, October 15, 2011

Vote for my post on Mom Blog Network

Strawberry Popsicles

Cati has an interesting approach to fruits. Some fruits she likes fresh and some fruits she likes only in the frozen-then-thawed variety. If I try to give her a fresh blueberry or cherry she won't eat it, but if she gets her hands on the frozen-then-thawed blueberries or cherries she can eat the whole bag in two sittings. I tried to see if she would eat the frozen-then-thawed strawberries but she refused. That left me stuck with three bags of frozen strawberries.
 IMG_4823
Luckily, there are enough strawberry recipes out there (like these cookies!). I wanted to make something a little different and thought this recipe for Strawberry Popsicles was the perfect thing to fit that desire. I'm not a fan of strawberries but I will tell you that I was a fan of these popsicles. Alex even said they were better than the store-bought popsicles, which is a huge compliment since these are so easy and fun to make.

Strawberry Popsicles
Source: Baked Bree
Makes 6 large popsicles

3 cups fresh (or frozen, thawed) strawberries, hulled and halved
1/2 cup honey or agave syrup
3 tablespoons fresh lemon juice

In a food processor, or blender combine the strawberries, honey and lemon juice. Process until smooth. Pour puree into molds and put in freezer. Freeze until solid, at least 4 hours.
Stephanie

Tuesday, April 12, 2011

Vote for my post on Mom Blog Network

TWD: Strawberry Crisp

Strawberry Crisp
It's by chance that I made this week's recipe. I overdid it with the strawberries at the store since they were on such a great sale. Problem is, I don't eat strawberries and I bought them all for Alex. As is customary, he forgot we even had strawberries and the strawberries were nearing the point of going bad. So I halved the recipe, omitted the rhubarb and ginger altogether, and got a deliciously simple strawberry crumble. Alex loved all of it and, as I expected, I loved the crisp and the strawberry sauce. Add a scoop of Blue Bell ice cream and this dessert is truly a keeper.

Thanks to Sarah of Teapots and Cakestands for making this week's selection. For the recipe go to her blog and don't forget to check out the other bakers on the TWD site.
Stephanie

Sunday, March 27, 2011

Vote for my post on Mom Blog Network

Apple Crisp

Apple Crisp
It's all about the little things in life. Those little wet baby kisses to fill you with joy. Those tender touches from your loved one to fill you with love. That small "thank you" at the end of the day to make you feel like it was all worth it. This Apple Crisp to make you feel all warm and cozy inside. You really can never go wrong with a dessert like this. I made it last week and this was one of the best crumbs recipe I've had in a while. My aunt even said we could eat just the crumbs with ice cream.

Apple Crisp
Source: Rhonda on Allrecipes.com

Crumbs
1/2 cups all-purpose flour
1/2 cups rolled oats
1/4 teaspoon ground cinnamon
1/8 teaspoon ground nutmeg
1/4 cup plus 2 Tbsp packed brown sugar
6 Tbsp butter

Apples
4 medium to large apples, cored and slice
1 Tbsp brown sugar
1 tsp brown sugar

Preheat oven to 350 degrees F (175 degrees C).

In a large bowl, combine the flour, oatmeal, cinnamon, nutmeg and brown sugar. Cut butter into mixture until crumbly.

Take half of the mixture and pat it into the bottom of a 9x13 inch baking dish.

Cover crumb mixture with apple slices, then sprinkle apple slices with remaining crumb mixture.

Bake at 350 degrees F (175 degrees C) for 45 to 50 minutes or until apples are tender.
Stephanie

Saturday, March 12, 2011

Vote for my post on Mom Blog Network

Shallot and Apple Stuffed Bacon Chicken

Roasted Chicken, Mashed Potatoes, Corn Bread
I don't know why, but roasting a chicken freaks me out. I have no problem roasting a turkey. In fact, I enjoy roasting turkey. Chicken, on the other hand, poses a culinary problem for me. It's smaller than a turkey and should technically be easier, but I just have a mental block about it. The best explanation I can come up with is that the insides aren't in little baggies like the insides of a turkey and having to pull out the insides creeps me out.

Anyway, the point is that roasting a chicken is something I never do because of my issues. After this recipe, however, I think that's going to change. We had a whole chicken in the freezer and I told Alex I refused to buy any more meats until we used up what we had first, so I needed to figure out what to do with the chicken. In comes this recipe and the result was a chicken that was so delicious and juicy that it rivaled all those roasted chickens I've bought from Publix. You can never go wrong with bacon and the apples added a nice sweetness to the chicken. I think the bacon grease helped keep the chicken moist from the outside and the juice released from the apples helped keep the chicken moist from the inside.
Bacon Wrapped Roasted Chicken

Shallot and Apple Stuffed Bacon Chicken
Source: Kayotic Kitchen 

1 whole chicken
5 shallots
1 sweet apple
1 large garlic clove
1 rosemary sprig
3 oz bacon (thick slices)
3 tbsp butter or oil
1 tsp seasoning (I used Adobo All-Purpose Seasoning)

Preheat oven to 350 degrees F. Line a pan with aluminum foil and spray with cooking oil.

Peel and coarsely chop the shallots. Grate or mince the garlic. Peel and dice the apple.

Heat a Tbsp butter or oil and add the shallots.Season the shallots with a pinch of pepper and salt. Sauté them over low to medium heat for about 5 minutes. As soon as they’ve browned up a bit add the diced apples. Add the garlic and cook things a few minutes, until the apples get a slight tan but are still firm. Turn off the heat.

Fill the chicken with the shallots and apples and push a rosemary sprig in there as well for some extra flavor.


Brush the chicken with the remaining butter or oil. Season it with your desired seasoning. Wrap the breast part of the chicken with bacon.

Place in oven and cook for 90 minutes or until the chicken reaches an internal temperature of 180 degrees F. Remove from oven and let it rest for 10 minutes before cutting.
Stephanie

Wednesday, February 16, 2011

Vote for my post on Mom Blog Network

Dessert Table Sweet: Apple Pie Pops

IMG_0119c
Here's another dessert table favorite. And really, how could it not be? Everyone loves apple pie, especially ones that are cute and bite-sized. These were the most time intensive of the desserts I made but the effort was worth it because they were beautiful and delicious.

Other Dessert Table Sweets include Easy Oreo Truffles

Apple Pie Pops
Source: Our Best Bites
Yields approximately 30-2" round pops

2 sheets of  store bought pie crust dough
6" lollipop stick
Small bowl of water
2 tablespoons butter, melted
Course sugar or sprinkles for top
Apple pie filling
Cutter: I used a shot glass to cut out the circles


Apple Pie Filling (combine all ingredients below):
1 medium tart green apple, peeled and grated
1/4 tsp ground cinnamon
1 tablespoon packed brown sugar
1 tablespoon flour
1/2 tablespoon lemon juice
1 tablespoon cold butter, grated

Preheat oven to 375 degrees. Line a baking sheet with parchment or a silicone baking mat if desired.

Roll out pie dough on a floured surface about 1/8 inch thick. Cut out shapes and place them on your baking sheet. Place about 1 tsp of filling on one cut out, keeping it away from the edges. Place 6 inch lollipop stick in center of shape, with the top of the stick near the top of the shape. Wet your finger in a small bowl of water and wet the edge of the pie dough shape. Wet the edges of a 2nd pie dough shape (one without filling) and place on top of the other. Press together gently with your fingers to seal the pieces together. Use a fork to crimp edges, being careful to seal edges around the stick. Poke a fork into top of pie one time so steam can vent. If desired, brush top of pie in melted butter and sprinkle with sugar.

Bake pies for 15-20 minutes until barely golden brown. Cool for a few minutes and then transfer to a cooling rack. Cool completely before packaging. If desired, place in cellophane bags and tie with ribbons and labels.
Stephanie

Tuesday, December 14, 2010

Vote for my post on Mom Blog Network

TWD: Apple Family Cake

Apple Family Cakes
The selection this week was for an Apple-Coconut Family Cake but seeing how much my darling husband despises shredded coconut so much, I left it out. I also didn't do the glaze because I didn't have the jelly on hand and I was afraid this would make the dessert too tart. It's a shame about the coconut because I think the cakes would have tasted a million times better with the coconut in it.  Don't get me wrong, the cake tasted fine with just the apples but it was kind of bland. I tried to flavor-up the cakes by adding powdered sugar and caramel sauce. The powdered sugar didn't do much but the caramel sauce improved the cakes A LOT. The cakes were literally transformed from a bland treat to a tasty delight.
Apple Family Cakes
Thanks to Amber of Cobbler du Monde for this week's selection. Make sure to head to her blog for the recipe and to the TWD site to see what everyone else thought about this cake.
Stephanie

Tuesday, November 9, 2010

Vote for my post on Mom Blog Network

TWD: Apple Shortbread Cake

Apple Shortbread Cake
I made this cake last night and because I made it so late I didn't get to taste it until this morning. That was probably the best thing that could have happened because the cake was perfect for breakfast. I don't know if it's because I halved the recipe and used one whole egg and apples instead of cranberry but the cake tasted more like a pastry than an actual cake, thus making it perfect for breakfast. I also wish I would have chopped up more apples for the filling. Regardless, the cake was easy to make and made to be paired with whatever filling concoction you can think up.

How pretty is it as a centerpiece?
Apple Shortbread Cake

Thanks to Jessica of Singleton in the Kitchen for choosing Not-Just-for Thanksgiving Cranberry Shortbread Cake. Make sure to head over to the TWD site to see what everyone else did.
Apple Shortbread Cake
Stephanie

Friday, October 15, 2010

Vote for my post on Mom Blog Network

Goat Cheese & Apple Chicken

Chicken w/ Goat Cheese & Apple
As far as I can remember I've only had goat cheese 3 times in my life. I saw the goat cheese at the market and I had to buy it. My mouth watered at the thought of chicken topped with goat cheese, apple, and maple syrup. The dish did not disappoint. The goat cheese apple mixture provided a smooth and tart contrast to the crispy and savory chicken. Let's not forget about the maple syrup and how well its sweetness paired with the goat cheese. I licked my plate clean it was that good.

Goat Cheese & Apple Chicken
Serves 2

1 chicken breast, halved
3/4 cup Saltine cracker crumbs
1/2 tsp garlic salt
1 egg
2 Tbsp olive oil
3 oz goat cheese, at room temperature
1/2 an apple chopped
Salt
Pepper
Maple syrup

Preheat oven to 250 degrees F. Line a baking dish with aluminum foil and spray with cooking oil. 

Season chicken with salt and pepper. In a small bowl combine the cracker crumbs and garlic salt. In another small bowl whisk the egg with a fork. Dip the seasoned chicken into the egg and then the cracker mixture.

Over medium heat, add the oil and then cook the chicken until brown and crispy and cooked through. Place the chicken on the baking dish.

In another small bowl combine the goat cheese and the apples. Spread mixture evenly over the chicken breasts. Drizzle with maple syrup.

Bake for about 20 minutes or until cheese is warm and browned. Remove from oven.

Drizzle with more maple syrup. Serve and enjoy!
Chicken w/ Goat Cheese & Apple
Stephanie

Wednesday, October 13, 2010

Vote for my post on Mom Blog Network

Cookies: Caramel Apple {Pie} Cookies

Caramel Apple Pie Cookies
I wanted to make Apple Pie Cookies. I was in between a soft cookie base a la snickerdoodle and a hard cookie base a la shortbread cookie. I went with the snickerdoodle base because I'm a soft and chewy cookie kind of girl. The cookies didn't come out exactly how I wanted but they were still a great apple cookie full of of spice. I drizzled the cookies with caramel sauce but Alex said he liked the cookies better without the caramel.  You can also skip cooking the apples; I wanted to add more spice to the cookies and help the apples be more tender but I don't think that step is completely necessary.
 Caramel Apple Pie Cookies

Caramel Apple Cookies

The cookies
1 1/4 cup all-purpose flour
1 tsp baking powder
1/2 tsp cinnamon
1/4 tsp nutmeg
1/4 tsp salt
1 stick (8 Tbsp) butter, at room temperature
3/4 cup sugar
1 egg
1 tsp vanilla

The apples
1 apple, chopped
2 Tbsp butter
2 Tbsp sugar
1 tsp cinnamon

Caramel sauce, optional

Preheat oven to 350 degrees F. Place parchment paper on two baking sheets.

In a bowl combine the flour, baking powder, cinnamon, nutmeg, and salt. Set aside.

In another bowl cream the butter and sugar. Add egg, beating for a minute after addition, and vanilla. Slowly add flour mixture and mix until just combined. Place batter in refrigerator while you make the apples.

In a pan, over medium heat, melt together the butter, sugar, and cinnamon. Cook for about 3 minutes until sugar is melted. Add the apples and cook for another 3-5 minutes or until apples are tender.

Stir apples into batter and, using a cookie scoop, scoop batter onto baking sheet leaving 2 inches between cookies. Bake for 10-15 minutes, or until cookies are brown and firm to touch. 

Cool to room temperature and drizzle with caramel sauce. Enjoy!
Caramel Apple Pie Cookies
Stephanie

Monday, October 11, 2010

Vote for my post on Mom Blog Network

{Late} TWD: Apple Bundt Cake

Apple Bundt Cake
I'm running behind. Seems like I'm always playing catch up these days. I made this bundt cake over the weekend. The cake was delicious but didn't taste like apple. That's purely my fault though because I used honey butter instead of apple butter and the honey completely overpowered the apples. Alex insisted the cake tasted of molasses but I think it tasted like all the goodness of fall spices.
 Apple Bundt Cake
Thanks to Lynne of Honey Muffin for last week's selection. Make sure to go to her blog for the recipe and to the TWD site to hear what the other bakers thought.
Apple Bundt Cake
Stephanie

Monday, September 20, 2010

Vote for my post on Mom Blog Network

The Cake Slice: Fresh Apple Cake with Brown Sugar Glaze

IMG_2032
This is the last month we bake out of Nancie McDermott's book. I thought I'd put together a special good-bye and made the Fresh Apple Cake with Brown Sugar Glaze into cupcakes with a dulce de leche filling. The cupcakes were delicious and made me wish for those cool fall days. You really can't go wrong with dulce de leche hidden within a warm apple cake.

As a side note, The Cake Slice will begin baking from a new book next month and membership is open once again. If you are interested, you can email Katie at ‘appleandspice[AT]hotmail.co.uk’ with ‘Cake Slice Member’ as the subject. Make sure to include your name, blog name and blog URL.
IMG_2019

Fresh Apple Cake with Brown Sugar Glaze
Source: Southern Cakes by Nancie McDermott

Fresh Apple Cake
3 cups all purpose flour
2 cups sugar
1 tsp baking soda
1 tsp salt
3 eggs
1½ cups vegetable oil
2 tsp vanilla extract
3 cups finely chopped apples
1 cup coarsely chopped pecans or walnuts

Brown Sugar Glaze
1 cup tightly packed light brown sugar
1/3 cup butter
1 tsp vanilla extract
2 tbsp evaporated milk, half-and-half or cream

Method – Fresh Apple Cake

Heat the oven to 350F. Grease a 13 by 9 inch pan or two 8-9 inch cake pans.
In a medium bowl combine the flour, sugar, baking soda and salt. Stir with a fork to mix everything together well.

In a large bowl, beat the eggs with a wooden spoon or a mixer at low speed until pale yellow and foamy. Add the oil and vanilla and beat well. Stir in the flour mixture with a wooden spoon and continue stirring the batter just until the flour disappears. Add the apples and nuts, stir to mix them into the batter until fairly uniform. Scrape the batter into the prepared pans.

Bake for 45-50 minutes or until the cake is golden brown, springs back when touched lightly near the centre and is beginning to pull away from the sides of the pan. Place the cake (still in the pans) on a wire rack and spoon over the glaze while still hot.

Method - Brown Sugar Glaze

Combine all the ingredients in a medium saucepan. Cook over medium heat, stirring often, until the mixture comes to a gentle boil. Then cook for 3-5 minutes.

Spoon the hot glaze all over the hot-from-the-oven cake. Let the glazed cake cool completely before serving straight from the pan.
IMG_2054
Stephanie