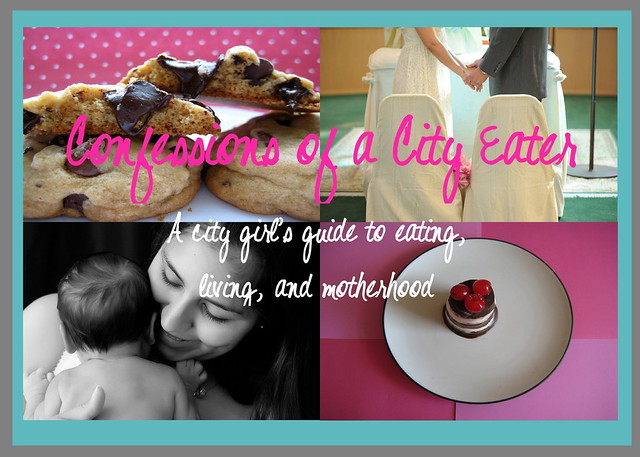
Tuesday, April 29, 2008
Obsession of the Week
Along with dreaming of a new kitchen, I dream of having a house. I don't even know what I would do with myself if I had more than 300 square feet to live in. I think I'd want to swim in all the space and sleep in the closets or something. I have already warned Alex that we will probably go broke because I am going to throw myself into the role of decorator. I find comfort in knowing that at least our kitchen will be stocked up (popcorn and ice cream maker anyone?). I'm just going to have trouble figuring out what to do with the rest of the rooms. The only thing I am sure of is that I'd like to have a mural in one of the rooms (most likely of frogs and penguins...I love those suckers). This idea was put in my head by my great friend Nadi the day she shared her blog with me. I had never thought of having a mural in a bedroom (or any part of the house for that matter) and now I have become obsessed with the idea. I think it's such a great way to really jazz up a room and add your unique stamp to the space. Thanks to Nadi, I'm even more house crazy. There is so much I want to do the day I have a house, like run to one side of the house and see if Alex can hear me if I talk. Sometimes I think that maybe living in Boston has been a dream and that tomorrow I will wake up to this:
 Did I mention this is the second half of the house?
 Oh yeah...this is the third side of the house.
 PS Don't tell Alex about this post. For the past 5 years I have been on his case about how absurd his desire to have a house like this is. The man must have rubbed off on me, because I secretly want a house like this now. Only I want it with a built-in maid ;-)
Tuesdays With Dorie: Figs Galore
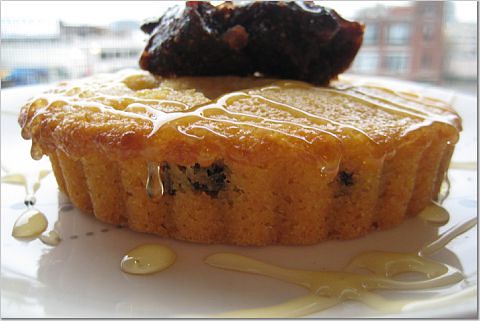
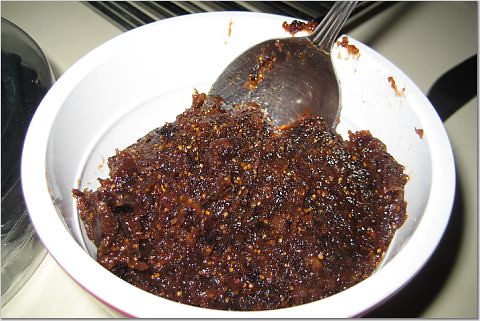
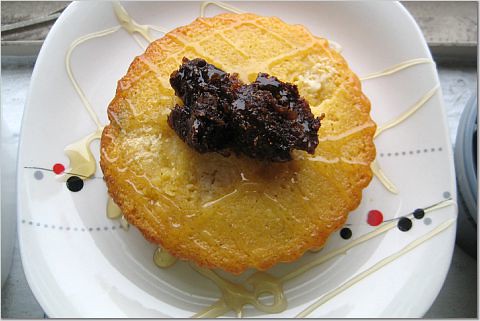
Everything started out fine. I was excited to finally make something with figs and to use my little tart pans again. I decided to halve the recipe and who would have thought that was the best decision I made all weekend. First of all, I was distracted because I was talking to my sister and didn't butter the tart pans (not a problem since they were nonstick and there was enough butter in the batter to grease it up) and I added 2/3 cup of ricotta versus the 1/2 cup the recipe calls for. Did I mention that I added 2/3 cup of ricotta twice? "How did you do that Stephanie?" you ask. Well let me tell you...I blame it on my kitchen. One wrong move and my bowl full of ricotta, water, honey, sugar, and lemon zest fell all over the kitchen floor. GREAT. Since I halved the recipe I had just enough ricotta and lemon zest to make a second batch. Good thing too because I wasn't in the mood to leave the house again. This time everything went smoothly and the little suckers baked to perfection. Because they looked so plain to me I decided to make a fig spread and this was a great touch because it complemented the cornmeal consistency perfectly.
For the full recipe click here and check out all of the amazing blogs.
Fluted Polenta and Ricotta Cake
Source: Dorie Greenspan’s “Baking From My Home to Yours”
About 8 moist, plump dried Mission or Kadota figs, stemmed (Since I used small tart pans, I sliced the figs)
1/2 cup medium-grain polenta or yellow cornmeal (I used cornmeal)
1⁄4 c. all-purpose flour
1/2 tsp baking powder
1/2 cup ricotta
1/6 cup tepid water
1⁄4 and 1/8 cups sugar
1⁄4 and 1/8 cups honey (if you’re a real honey lover, use a full-flavored honey such as chestnut, pine, or buckwheat)
Grated zest of 1/2 lemon
1 large eggs
Getting Ready: Center a rack in the oven and preheat the oven to 325 degrees F. Butter a 10 1⁄2-inch fluted tart pan with a removable bottom and put it on a baking sheet lined with parchment or a silicone mat. (By halving the recipe I had enough batter to fill 3 small tart pans)
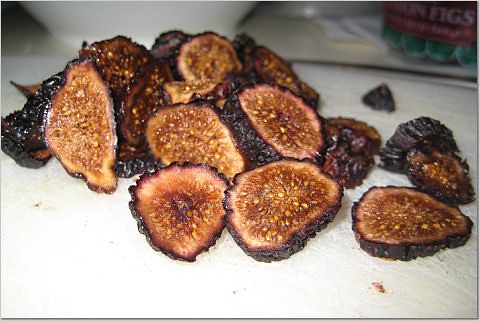
Check that the figs are, indeed, moist and plump. If they are the least bit hard, toss them into a small pan of boiling water and steep for a minute, then drain and pat dry. If the figs are large (bigger than a bite), snip them in half. (I sliced them)
See what I mean about being gross looking?
Working with a stand mixer fitted with the whisk attachment or with a hand mixer in a large bowl, beat the ricotta and water together on low speed until very smooth. With the mixer at medium speed, add the sugar, honey, and lemon zest and beat until light. Beat in the melted butter, then add the eggs one at a time, beating until the mixture is smooth. Reduce the mixer speed to low and add the dry ingredients, mixing only until they are fully incorporated. You’ll have a sleek, smooth, pourable batter.
Pour about one third of the batter into the pans and scatter over the figs. Pour in the rest of the batter, smooth the top with a rubber spatula, if necessary, and dot the batter evenly with the chilled bits of butter.
Pretty layer of figs.

Bake for 35 to 40 minutes, or until a thin knife inserted into the center of the cake comes out clean. The cake should be honey brown and pulling away just a little from the sides of the pan, and the butter will have left light-colored circles in the top. Transfer the cakes to a rack and remove the sides of the pans after about 5 minutes. Cool to warm, or cool completely.
Fresh out the oven.

Fig Spread
3/4 cup sliced dried figs
1/2 cup water
1 Tbsp honey
Bring the water and honey to a boil, then add the dried figs and simmer for about 10 minutes.
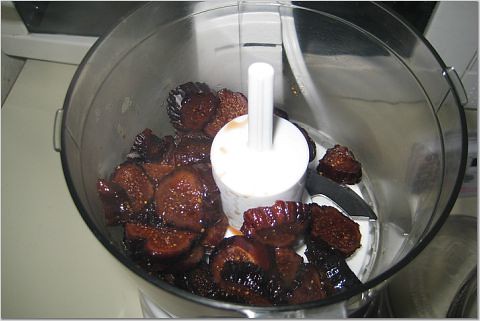
Place the figs and fluid in a food processor and blend until thoroughly mixed.
Scrape the mixture out of the food processor and scoop some onto the tarts.
Serve and enjoy!
Before and After
Complete concoction with the addition of honey.
Close up of layers...cake, figs, cake, and more figs.

Monday, April 28, 2008
My Tiny Kitchen
I do not lie when I say my kitchen is tiny. I actually measured it out; it's 5 feet wide by 93 inches long. That's roughly 39 square feet. Yikes. I just got sad seeing that number. My kitchen is the source of much misery. There is very little counter space and cabinet space. We had the genius idea of buying a kitchen cart which fit perfectly in our kitchen up until our fridge broke and the management company gave us a fridge that's about 6 inches bigger than our old fridge. So out went the kitchen cart and we were back to square one with the tiny kitchen. Alex and I cannot be in the kitchen at the same time and because of how small the kitchen is there have been multiple occasions of ingredients falling and me getting upset. Small living spaces are the hallmark of northern living and while I can handle (at times) a small bedroom and bathroom, I cannot stand a small kitchen. All my moments spent in the kitchen are filled with dreams of a bigger kitchen. I cannot wait for an upgrade. I try to convince Alex that an upgrade to a bigger apartment would be better for my stress levels but then the price tag of a bigger apartments sets his stress levels soaring. Since my main goal of living in Boston is to not stress Alex out I'll suck it up, but the man better not give me any trouble in fulfilling my kitchen dreams later on. And just in case your curious, here's the demon of my household (yes that is the entire kitchen):

Sunday, April 27, 2008
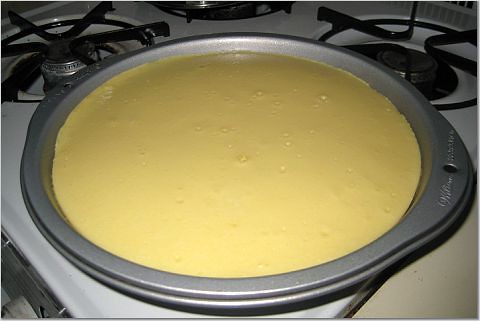
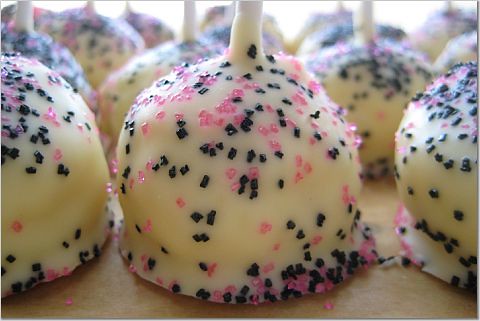
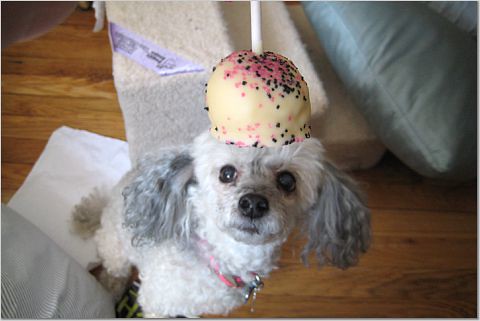
Daring Bakers: Cheesecake Pops

I have found the secret to making the perfect cheesecake. The first time I made cheesecake wasn't a disaster per se because it tasted good, but it wasn't pretty. The cake didn't bake evenly and I ended up having very brown edges and a center that didn't set. I was especially nervous because this was my attempt at impressing Alex's family with yet another dessert. Luckily enough, the cherry topping I used hid all the imperfections. After making this month's challenge I realize that what I missed out on was a water bath. I have never made a prettier cheesecake and all credit goes to the water bath. The cake baked evenly and beautifully. I was actually sad to have to break it up and scoop it into balls, but duty called and the Daring Bakers challenge called for it. So on I went scooping away (and licking my fingers and washing my hands between each scoop) and building excitement for the final dipping. I chose to use white chocolate because I wanted to make sure that my pink and black sprinkles showed and, plus, I love white chocolate. Dipping them was the funnest part for me and waiting for them to set was torture. It was all worth the wait because they tasted great! Again, I halved the recipe, so if you'd like to see the whole recipe go check out the Daring Bakers Blogroll and have a field day looking through all the delicious blogs.
Thanks to Elle of Feeding my Enthusiasm and Deborah of Taste and Tell for picking April's challenge.
Cheesecake Pops
Source: Jill O'Connor's "Sticky, Chewy, Messy, Gooey"
Makes 20 – 25 Pops
- 2 8-oz. plus 4 oz packages cream cheese at room temperature
- 1 cups sugar
- 1⁄8 cup all-purpose flour
- 1⁄8 teaspoon salt
- 2.5 large eggs (I scrambled the third egg and just used half of it)
- 1 egg yolk
- 1/2 tsp pure vanilla extract
- 1⁄8 cup heavy cream
- Boiling water as needed
- Twenty to twenty-five 8-inch lollipop sticks
- 1/2 pound chocolate, finely chopped – you can use all one kind or half and half of dark, milk, or white (Alternately, you can use 1 pound of flavored coatings, also known as summer coating, confectionary coating or wafer chocolate – candy supply stores carry colors, as well as the three kinds of chocolate.)
- 1 Tbsp vegetable shortening
- Assorted decorations such as chopped nuts, colored jimmies, crushed peppermints, mini chocolate chips, sanding sugars, dragees) - Optional
Position oven rack in the middle of the oven and preheat to 325 degrees F. Set some water to boil.
In a large bowl, beat together the cream cheese, sugar, flour, and salt until smooth. If using a mixer, mix on low speed. Add the whole eggs and the egg yolks, one at a time, beating well (but still at low speed) after each addition. Beat in the vanilla and cream.
Grease a 9-inch cake pan (not a springform pan), and pour the batter into the cake pan. Place the pan in a larger roasting pan. Fill the roasting pan with the boiling water until it reaches halfway up the sides of the cake pan. Bake until the cheesecake is firm and slightly golden on top, 35 to 45 minutes.
Remove the cheesecake from the water bath and cool to room temperature. Cover the cheesecake with plastic wrap and refrigerate until very cold, at least 3 hours or up to overnight.
So Pretty :)
When the cheesecake pops are frozen and ready for dipping, prepare the chocolate. In the top of a double boiler, set over simmering water, or in a heatproof bowl set over a pot of simmering water, heat half the chocolate and half the shortening, stirring often, until chocolate is melted and chocolate and shortening are combined. Stir until completely smooth. Do not heat the chocolate too much or your chocolate will lose its shine after it has dried. Save the rest of the chocolate and shortening for later dipping, or use another type of chocolate for variety.
Alternately, you can microwave the same amount of chocolate coating pieces on high at 30 second intervals, stirring until smooth.
Quickly dip a frozen cheesecake pop in the melted chocolate, swirling quickly to coat it completely. Shake off any excess into the melted chocolate. If you like, you can now roll the pops quickly in optional decorations. You can also drizzle them with a contrasting color of melted chocolate (dark chocolate drizzled over milk chocolate or white chocolate over dark chocolate, etc.) Place the pop on a clean parchment paper-lined baking sheet to set. Repeat with remaining pops, melting more chocolate and shortening (or confectionary chocolate pieces) as needed.
Sprinkled and all done up.

Closeup of Goodness.
It was creamy and fluffy.

I can't resist...it's Perla with a cheesecake hat.
Tuesday, April 22, 2008
My Favorite View
If there's one thing I'm going to miss about Boston it's going to be this view:

I wrote a paper this semester about the Prudential building (middle building). You can see that building from just about any location in Boston. I consider it the North Star of Boston because as long as I can see the Prudential building I know how to get home. On an incredibly sunny day these three buildings look like they are painted in the sky. They look good year round too:

The best part of this view? Prudential has a restaurant on the 52nd floor (Top of the Hub) and we ate there the night Alex proposed to me.
 City view from Prudential.
I wrote a paper this semester about the Prudential building (middle building). You can see that building from just about any location in Boston. I consider it the North Star of Boston because as long as I can see the Prudential building I know how to get home. On an incredibly sunny day these three buildings look like they are painted in the sky. They look good year round too:
The best part of this view? Prudential has a restaurant on the 52nd floor (Top of the Hub) and we ate there the night Alex proposed to me.
Me on one of the happiest days of my life.
I am a believer...
I remember watching an episode of the Phantom Gourmet one Saturday morning and being amazed that they had a South End vs North End debate going on. They brought in an "expert" on eating in each neighborhood and the point was for them to discuss which neighborhood had a better dining scene. Based on my previous experience with the South End (portion size, price) I was convinced that the North End was better. After this weekend I am really starting to think about which neighborhood is better.
I hadn't made dinner reservations because Alex was supposed to be on call Sunday and I didn't think he'd want to go out on Saturday night. I was surprised when he said he wanted to go out and I was even more surprised when he took the initiative and made the reservation! Let me tell you that he made a great decision! We went to Beehive and it was such a great dinner that it made me reconsider all my prior opinions about the South End. My only regret was that our reservation was so early that we didn't get to enjoy the live music. Not a problem though, because we will definitely be going back.
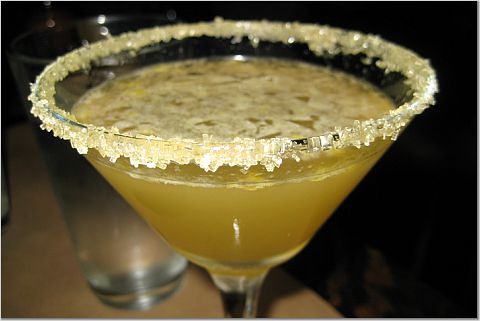
We were seated in this cozy table about 10 feet from the stage. The restaurant has a very vintage, New Orleans feel so I can only imagine how great it must be to sit there with a cocktail in hand listening to live music. I started off the night by getting their Blonde Sidecar martini. Wow. That's all I have to say about this drink. Just wow. This has to be one of my favorite drinks. It was so good. The flavors blended so well; it tasted like an alcohol soaked star fruit. Delicious!
 We shared the Mini Beef Wellington appetizer. I have never had beef wellington so I didn't know what to expect. Alex has had it several times and was hoping that it would be good. Well, they brought it out and at first we were disappointed because it seemed like such a small serving. Fear immediately set in that the entrees would be small servings as well and that Beehive was just like every other South End restaurant. The appetizer was three mini beef wellingtons soaking in some kind of au jus. Over discussion about how puff pastry is made we ate the appetizer. I couldn't believe it was possible for such a little thing to taste so good. My taste buds were jumping in joy as the flavors filled my mouth. Alex said this was how a beef wellington should be made.
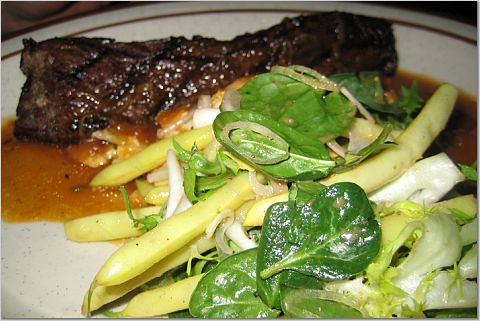
 Alex ordered the Grilled Hanger Steak with potato gratin. He order it medium but it came out medium rare. Don't worry though, the man has never turned down a steak. The steak was tender and, for the first time ever, the steak was so big that Alex couldn't finish it. I could barely believe my eyes and ears when I looked at Alex's plate and then his face as he said "I can't eat anymore." This was definitely a first in the South End.
 I ordered the Paella. Paella is a plate full of goodness. It's composed of a risotto-style rice and all kinds of meat and seafood. This one in particular had chicken, sausage, shrimp, clams, calamari, squid, and mussels. The rice was very moist and the flavor was mild enough to really showcase and enhance the flavors of the meat and seafood.
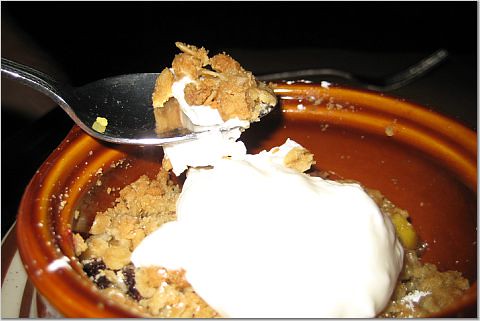
 I'm assuming that they have different desserts nightly because there is no official dessert menu. We were offered three things and I can only remember two of them. One was a cheesecake and the other was an apple-cranberry crisp. Because we had cheesecake at home I ordered the apple-cranberry crisp. It was such a great choice because this dessert was fantastic. The apples were tender and the cranberries were tart. The crispy crust was amazing. Don't laugh at this description, but it was very crisp! The oats and the cinnamon were the dominant textures and flavors in the crisp crust. It was topped with a spoonful of whipped cream.
 Beehive is located in the South End and is a great place for dinner. If you are looking for a restaurant with great prices and great food I definitely recommend going there...you won't regret it!
I hadn't made dinner reservations because Alex was supposed to be on call Sunday and I didn't think he'd want to go out on Saturday night. I was surprised when he said he wanted to go out and I was even more surprised when he took the initiative and made the reservation! Let me tell you that he made a great decision! We went to Beehive and it was such a great dinner that it made me reconsider all my prior opinions about the South End. My only regret was that our reservation was so early that we didn't get to enjoy the live music. Not a problem though, because we will definitely be going back.
We were seated in this cozy table about 10 feet from the stage. The restaurant has a very vintage, New Orleans feel so I can only imagine how great it must be to sit there with a cocktail in hand listening to live music. I started off the night by getting their Blonde Sidecar martini. Wow. That's all I have to say about this drink. Just wow. This has to be one of my favorite drinks. It was so good. The flavors blended so well; it tasted like an alcohol soaked star fruit. Delicious!
This picture isn't great because I only have one shot to take a
picture of Alex's food before he shoots me the evil eye.
picture of Alex's food before he shoots me the evil eye.
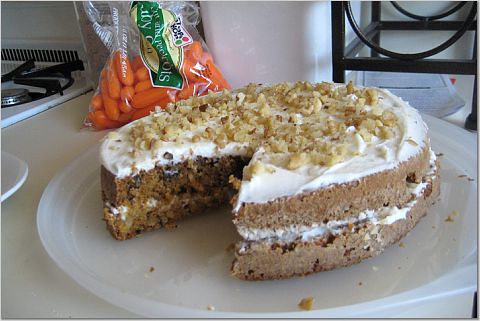
Tuesdays With Dorie: Carrot Cake

I halved the recipe because it would have been too much for the two of us to eat. The cake was delicious. I knew it would be good because the batter was good (yes, I eat batter and I'm not ashamed!). My only gripe was the addition of the lemon juice/extract to the frosting. In my opinion, carrot cake is best with a frosting that tastes strongly of cream cheese. The lemon juice/extract overpowered the cream cheese taste. I was pleasantly surprised to taste that the cake had a rich enough flavor to downplay the lemon taste in the frosting. If you want to see the original recipe I recommend going to the Tuesday's With Dorie website and checking out all the great blogs.
Bill's Big Carrot Cake
Source: Dorie Greenspan’s Baking: From My Home to Yours
For the cake:
1 cup all purpose flour
1 tsp baking powder
1 tsp baking soda
1 tsp ground cinnamon
1⁄4 and 1/8 tsp salt
1.5 cups grated carrots (I used about 20 baby carrots)
1/2 cup coarsely chopped walnuts or pecans
1/2 cup shredded coconut (sweetened or unsweetened)
1⁄4 cup moist, plump raisins (dark or golden) or dried cranberries (I omitted)
1 cup sugar
1/2 cup canola oil
2 large eggs
For the frosting:
4 oz cream cheese, room temperature
1/2 stick (4 Tbsps) unsalted butter, at room temperature
1/2 pound or 1 3⁄4 cups plus 1/8 cup confectioners' sugar, sifted
1/2 tablespoon fresh lemon juice or 1⁄4 teaspoon pure lemon extract
1⁄2 cup shredded coconut (optional) (I omitted)
Finely chopped toasted nuts and/or toasted shredded coconut (optional)
Getting ready:
Position the racks to divide the oven into thirds and preheat the oven to 325 degrees Fahrenheit. Butter one 9-x-2-inch round cake pan, flour the insides, and tap out the excess.
To make the cake:
Whisk the flour, baking powder, baking soda, cinnamon and salt. In another bowl, stir together the carrots, chopped nuts, coconut, and raisins.
Working with a stand mixer, preferably fitted with a paddle attachment, or with a hand mixer in a large bowl, beat the sugar and oil together on a medium speed until smooth. Add the eggs one by one and continue to beat until the batter is even smoother. Reduce the speed to low and add the flour mixture, mixing only until the dry ingredients disappear. Gently mix the chunky ingredients. Divide the batter among the baking pans.
Bake for about 30 minutes, until a thin knife inserted into the center comes out clean. The cake will have just started to come away from the sides of the pan. Transfer the cake to cooling racks and cool for about 5 minutes, then run a knife around the sides of the cake and unmold it. Invert and cool to room temperature right side up.
The cake can be wrapped airtight and kept at room temperature overnight or frozen for up to 2 months.
To make the frosting:
Working with a stand mixer, preferably fitted with a paddle attachment or with a hand mixer in a large bowl, beat the cream cheese and butter together until smooth and creamy. Gradually add the sugar and continue to beat until the frosting is velvety smooth. Beat in the lemon juice or extract.
If you'd like coconut in the filling, scoop about half of the frosting and stir the coconut into this position.
To assemble the cake:
Using a serrated knife cut the cake in half and put the top layer on a cardboard cake round or a cake plate protected by strips of wax or parchment paper. If you added the coconut to the frosting, use half of the coconut frosting to generously cover the bottom layer (or generously cover with plain frosting). Use an offset spatula or a spoon to smooth the frosting all the way to the edges of the layer. Top the bottom layer with the top layer, and frost the top- and the sides- of the cake. Finish the top with swirls of frosting. If you want to top the cake with toasted nuts or coconut, sprinkle them on now while the frosting is soft.
Refrigerate the cake for 30 minutes, just to set the frosting before serving.
Serving:
This cake can be served as soon as the frosting is set. It can also wait, at room temperature and covered with a cake keeper overnight. The cake is best served in thick slices at room temperature and while it's good plain, it's even better with vanilla ice cream or some lemon curd.
Storing:
The cake will keep at room temperature for 2 to 3 days. It can also be frozen. Freeze it uncovered, then when it's firm, wrap airtight and freeze for up to 2 months. Defrost, still wrapped, overnight in the refrigerator.
Pretty little cake


Tasty Tools: Best Cookies Ever
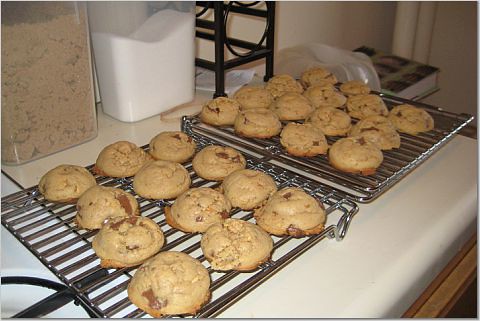
Joelen of Joelen's Culinary Adventures hosted another Tasty Tools event this month. The tool for this month was a scooper and once I found out this was the tool I immediately knew I wanted to make cookies. I LOVE cookies. They are my absolute favorite thing to bake. Cookies are like heaven to me, especially chocolate chip cookies. I have an unnatural obsession with chocolate chip cookies; I must make every recipe I encounter. (Note: if you have any good ones, send them my way!). I decided to try out another recipe from Carol Bloom's book "The Essential Baker." As soon as I spotted "Milk Chocolate Chunk-Peanut Butter Cookies" my taste buds went into overdrive. I was salivating just looking at the recipe. I thought the cookies came out great but I wasn't ready for Alex's reaction.
Like I said, I have made many cookies, but these cookies struck Alex in a way that I never thought a cookie could. After one bite, the words "best cookie ever" slipped out of his mouth. He was hooked. I've never seen the man go after cookies like he did with these cookies. I mean, I thought the cookies were good, but I didn't think they deserved the label "best cookie ever."
Joelen, thank you once again for hosting!
Milk Chocolate Chunk-Peanut Bitter Cookies
Source: Carol Bloom's The Essential Baker
3 oz (6 Tbsps) unsalted butter, at room temperature
1/2 cup unsalted natural-style chunky peanut butter, at room temperature
1/2 cup firmly packed light brown sugar
1/4 and 1/8 cup granulated sugar
1 extra large egg, at room temperature (1 extra large egg = 1 large egg)
1/2 tsp vanilla extract
1 cup all-purpose flour
1/4 tsp baking soda
1/4 tsp salt
3 oz milk chocolate, cut into small chunks (I love chocolate so I added 5 oz)
1. Preheat the oven to 350 degrees. Line baking sheets with parchment paper or non-stick liners
2. Beat the butter in a large bowl until fluffy, about 2 minutes
3. Add the peanut butter to the butter and mix together well. Scrape the sides and bottom of the the bowl with a rubber spatula
4. Add the brown sugar and granulated sugar to the butter mixture and cream together
5. Use a fork to lightly beat the egg and vanilla together in a small bowl. Add this to the butter mixture and blend thoroughly
6. Sift together the flour, baking soda, and salt. Add this to the butter mixture in 4 parts, blending well after each addition. Scrape the sides and the bottom of the bowl with a rubber spatula
7. Add the chocolate chunks and stir to distribute evenly
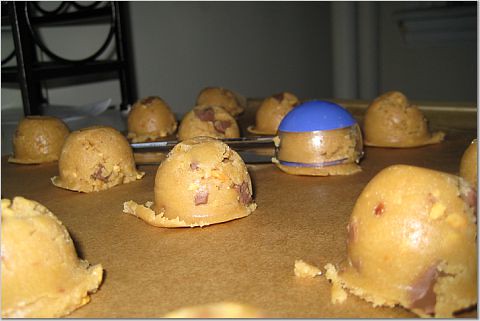
8. Using a scooper, scoop out mounds about 2 inches in diameter. Place the mounds on the baking sheets, leaving 2 inches of space between cookies
9. Bake the cookies for 5-7 minutes
10. Serve yourself a glass of milk and enjoy!

Served best with milk :)

Like I said, I have made many cookies, but these cookies struck Alex in a way that I never thought a cookie could. After one bite, the words "best cookie ever" slipped out of his mouth. He was hooked. I've never seen the man go after cookies like he did with these cookies. I mean, I thought the cookies were good, but I didn't think they deserved the label "best cookie ever."
Joelen, thank you once again for hosting!
Milk Chocolate Chunk-Peanut Bitter Cookies
Source: Carol Bloom's The Essential Baker
3 oz (6 Tbsps) unsalted butter, at room temperature
1/2 cup unsalted natural-style chunky peanut butter, at room temperature
1/2 cup firmly packed light brown sugar
1/4 and 1/8 cup granulated sugar
1 extra large egg, at room temperature (1 extra large egg = 1 large egg)
1/2 tsp vanilla extract
1 cup all-purpose flour
1/4 tsp baking soda
1/4 tsp salt
3 oz milk chocolate, cut into small chunks (I love chocolate so I added 5 oz)
1. Preheat the oven to 350 degrees. Line baking sheets with parchment paper or non-stick liners
2. Beat the butter in a large bowl until fluffy, about 2 minutes
3. Add the peanut butter to the butter and mix together well. Scrape the sides and bottom of the the bowl with a rubber spatula
4. Add the brown sugar and granulated sugar to the butter mixture and cream together
5. Use a fork to lightly beat the egg and vanilla together in a small bowl. Add this to the butter mixture and blend thoroughly
6. Sift together the flour, baking soda, and salt. Add this to the butter mixture in 4 parts, blending well after each addition. Scrape the sides and the bottom of the bowl with a rubber spatula
7. Add the chocolate chunks and stir to distribute evenly
8. Using a scooper, scoop out mounds about 2 inches in diameter. Place the mounds on the baking sheets, leaving 2 inches of space between cookies
9. Bake the cookies for 5-7 minutes
10. Serve yourself a glass of milk and enjoy!
Scooping the cookie
All ready to be baked
Cooling and waiting to be eaten
Cooling and waiting to be eaten
Served best with milk :)
Tuesday, April 15, 2008
Tuesdays With Dorie: Marshmallow Foe
Dear Marshmallow: What did I do to you to make you not like me? Never in my life did I think I would ever ask this but, did I not beat you enough? Did you decide you wanted to take the vacant post of Baking Foe? Now that I finally defeated Cheesecake Foe, I am introduced to Marshmallow Foe. I have no clue what I did wrong, but my mixture separated. I had one really nice layer of marshmallow and then one gross layer of gelatin. I think I know what the culprit was; I think it was that extra 1 tbsp of sugar that wasn't accounted for. I'm sure that sugar was supposed to be added to the eggs. Other possible reasons included Red Sox losing to the Yankees and it being a wet, humid night in the city (no central a/c = wet, humid apartment).
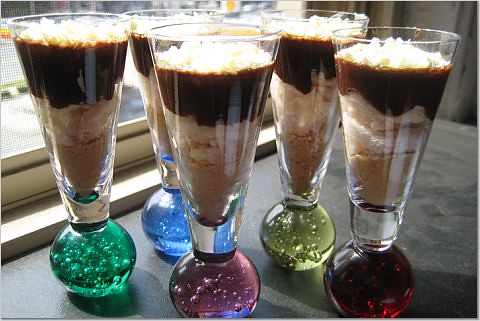
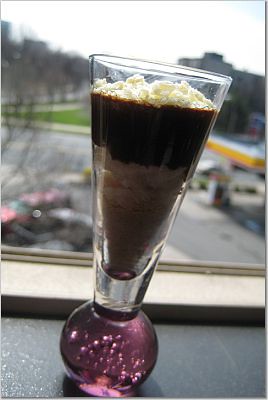
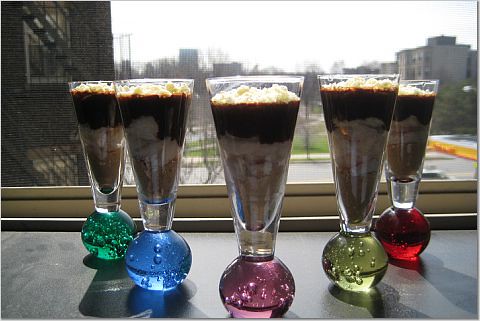
Everything started off great. I had everything ready to go. Once I had everything mixed together I tasted it and it tasted like liquid marshmallow. I was all happy pouring the mixture in the baking pan and setting it in a "cool, dry" place. I let it sit over night and woke up Saturday ready to cut it into pieces. I was convinced it came out great because the top looked so nice. But alas, I cut into it and was disappointed. I stood there in my kitchen trying to figure out what I wanted to do. Did I want to give up on the marshmallows or did I want to make the best of it? I decided to not let the goods go to waste and I took out some of my pretty glasses and made mini smores. Great choice because I was able to use the leftover ganache frosting from my Kahlua Cupcakes. Plus, they looked so cute and pretty :)
Thank you Judy of Judy's Gross Eats for hosting this week.
Marshmallows
Source: Dorie Greenspan's Baking From My Home to Yours
I'm giving you the recipe for a basic vanilla marshmallow. See Playing Around (below) for raspberry, chocolate, cappuccino and pumpkin marshmallows.
Makes about 1 pound marshmallows
About 1 cup potato starch (found in the kosher foods section of supermarkets) or cornstarch
2 tbsp light corn syrup
2 1/4-oz packets unflavored gelatin
3 large egg whites, at room temperature
3/4 cup cold water
1 tbsp pure vanilla extract
1 1/4 cups plus 1 tbsp sugar
Getting Ready: Line a rimmed baking sheet -- choose one with a rim that is 1 inch high -- with parchment paper and dust the paper generously with potato starch or cornstarch. Have a candy thermometer at hand.
Put 1/3 cup of the water, 1 1/4 cups of the sugar and the corn syrup in a medium saucepan over medium heat. Bring the mixture to a boil, stirring until the sugar dissolves. Once the sugar is dissolved, continue to cook the syrup -- without stirring -- until it reaches 265 degrees F on the candy thermometer, about 10 minutes.
While the syrup is cooking, work on the gelatin and egg whites. In a microwave-safe bowl, sprinkle the gelatin over the remaining cold water (a scant 7 tablespoons) and let it sit for about 5 minutes, until it is spongy, then heat the gelatin in a microwave oven for 20 to 30 seconds to liquefy it. (Alternatively, you can dissolve the gelatin in a saucepan over low heat.)
Working in the clean, dry bowl of a stand mixer fitted with the whisk attachment or in another large bowl with a hand mixer, beat the egg whites on medium-high speed until firm but still glossy -- don't overbeat them and have them go dull.
As soon as the syrup reaches 265 degrees F, remove the pan from the heat and, with the mixer on medium speed, add the syrup, pouring it between the spinning beater(s) and the sides of the bowl. Add the gelatin and continue to beat for another 3 minutes, so that the syrup and the gelatin are fully incorporated. Beat in the vanilla.
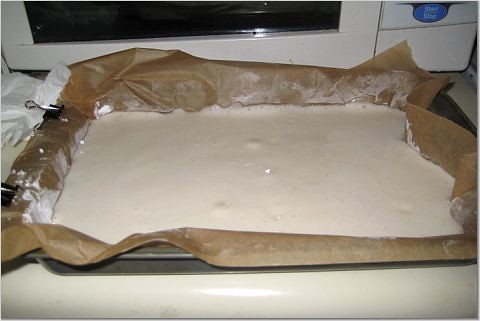
Using a large rubber spatula, scrape the meringue mixture onto the baking sheet, laying it down close to a short end of the sheet. Then spread it into the corners and continue to spread it out, taking care to keep the height of the batter at 1 inch; you won't fill the pan. Lift the excess parchment paper up to meet the edge of the batter, then rest something against the paper so that it stays in place (I use custard cups).
Dust the top of the marshmallows with potato starch or cornstarch and let the marshmallows set in a cool, dry place. They'll need about 3 hours, but they can rest for 12 hours or more.
Once they are cool and set, cut the marshmallows with a pair of scissors or a long thin knife. Whatever you use, you'll have to rinse and dry it frequently. Have a big bowl with the remaining potato starch or cornstarch at hand and cut the marshmallows as you'd like -- into squares, rectangles or even strips (as they're cut in France). As each piece is cut, drop it into the bowl. When you've got 4 or 5 marshmallows in the bowl, reach in with your fingers and turn the marshmallows to coat them with starch, then, one by one, toss the marshmallows from one hand to the other to shake off the excess starch; transfer them to a serving bowl. Cut and coat the rest of the batch.
Serving: Put the marshmallows out and let everyone nibble as they wish. Sometimes I fill a tall glass vase with the marshmallows and put it in the center of the table -- it never fails to make friends smile. You can also top hot chocolate or cold sundaes with the marshmallows.
Storing: Keep the marshmallows in a cool, dry place; don't cover them closely. Stored in this way, they will keep for about 1 week -- they might develop a little crust on the outside or they might get a little firmer on the inside, but they'll still be very good.
Playing Around
Raspberry Marshmallows: Fruit purees are excellent for flavoring these candies. For raspberry marshmallows, you'll need a generous 1/3 cup of puree; reduce the vanilla extract to 1/4 teaspoon. After the batter is mixed, gently fold in the puree with a rubber spatula. You can use the same measurements and technique for other purees, such as strawberry, mango and passion fruit.
Cappuccino Marshmallows: Sift 1/4 cup unsweetened cocoa powder, 2 tablespoons instant espresso powder and 1/2 teaspoon ground cinnamon together into a small bowl. Stir in 1/3 cup boiling water and mix until smooth. Reduce the vanilla extract to 1/2 teaspoon, and add it to the espresso mix. After you add the sugar syrup and gelatin to the meringue, beat in the espresso mixture and continue.
Light Chocolate Marshmallows: Melt 3 ounces bittersweet or semisweet chocolate and stir in 2 1/2 tablespoons unsweetened cocoa powder. Reduce the vanilla extract to 1/4 teaspoon, and after the marshmallow batter is mixed, fold in the chocolate mixture with a large rubber spatula.
Pumpkin Spice Marshmallows: Whisk together 1/2 cup canned unsweetened pumpkin puree, 1 teaspoon ground cinnamon, 1/2 teaspoon ground ginger, a pinch of freshly grated nutmeg and a pinch of ground allspice. After the marshmallow batter is mixed, fold in the spiced pumpkin with a large rubber spatula.
A few hours later that was Red Sox Nation in the background.
Everything started off great. I had everything ready to go. Once I had everything mixed together I tasted it and it tasted like liquid marshmallow. I was all happy pouring the mixture in the baking pan and setting it in a "cool, dry" place. I let it sit over night and woke up Saturday ready to cut it into pieces. I was convinced it came out great because the top looked so nice. But alas, I cut into it and was disappointed. I stood there in my kitchen trying to figure out what I wanted to do. Did I want to give up on the marshmallows or did I want to make the best of it? I decided to not let the goods go to waste and I took out some of my pretty glasses and made mini smores. Great choice because I was able to use the leftover ganache frosting from my Kahlua Cupcakes. Plus, they looked so cute and pretty :)
Thank you Judy of Judy's Gross Eats for hosting this week.
Marshmallows
Source: Dorie Greenspan's Baking From My Home to Yours
I'm giving you the recipe for a basic vanilla marshmallow. See Playing Around (below) for raspberry, chocolate, cappuccino and pumpkin marshmallows.
Makes about 1 pound marshmallows
About 1 cup potato starch (found in the kosher foods section of supermarkets) or cornstarch
2 tbsp light corn syrup
2 1/4-oz packets unflavored gelatin
3 large egg whites, at room temperature
3/4 cup cold water
1 tbsp pure vanilla extract
1 1/4 cups plus 1 tbsp sugar
Getting Ready: Line a rimmed baking sheet -- choose one with a rim that is 1 inch high -- with parchment paper and dust the paper generously with potato starch or cornstarch. Have a candy thermometer at hand.
Put 1/3 cup of the water, 1 1/4 cups of the sugar and the corn syrup in a medium saucepan over medium heat. Bring the mixture to a boil, stirring until the sugar dissolves. Once the sugar is dissolved, continue to cook the syrup -- without stirring -- until it reaches 265 degrees F on the candy thermometer, about 10 minutes.
While the syrup is cooking, work on the gelatin and egg whites. In a microwave-safe bowl, sprinkle the gelatin over the remaining cold water (a scant 7 tablespoons) and let it sit for about 5 minutes, until it is spongy, then heat the gelatin in a microwave oven for 20 to 30 seconds to liquefy it. (Alternatively, you can dissolve the gelatin in a saucepan over low heat.)
Working in the clean, dry bowl of a stand mixer fitted with the whisk attachment or in another large bowl with a hand mixer, beat the egg whites on medium-high speed until firm but still glossy -- don't overbeat them and have them go dull.
As soon as the syrup reaches 265 degrees F, remove the pan from the heat and, with the mixer on medium speed, add the syrup, pouring it between the spinning beater(s) and the sides of the bowl. Add the gelatin and continue to beat for another 3 minutes, so that the syrup and the gelatin are fully incorporated. Beat in the vanilla.
Using a large rubber spatula, scrape the meringue mixture onto the baking sheet, laying it down close to a short end of the sheet. Then spread it into the corners and continue to spread it out, taking care to keep the height of the batter at 1 inch; you won't fill the pan. Lift the excess parchment paper up to meet the edge of the batter, then rest something against the paper so that it stays in place (I use custard cups).
Dust the top of the marshmallows with potato starch or cornstarch and let the marshmallows set in a cool, dry place. They'll need about 3 hours, but they can rest for 12 hours or more.
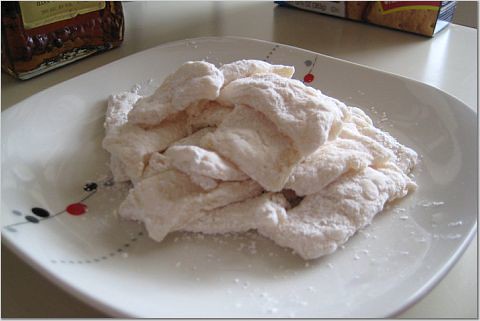
Looked good. Boy, was I wrong.
Once they are cool and set, cut the marshmallows with a pair of scissors or a long thin knife. Whatever you use, you'll have to rinse and dry it frequently. Have a big bowl with the remaining potato starch or cornstarch at hand and cut the marshmallows as you'd like -- into squares, rectangles or even strips (as they're cut in France). As each piece is cut, drop it into the bowl. When you've got 4 or 5 marshmallows in the bowl, reach in with your fingers and turn the marshmallows to coat them with starch, then, one by one, toss the marshmallows from one hand to the other to shake off the excess starch; transfer them to a serving bowl. Cut and coat the rest of the batch.
Can you see the nasty layers?

Serving: Put the marshmallows out and let everyone nibble as they wish. Sometimes I fill a tall glass vase with the marshmallows and put it in the center of the table -- it never fails to make friends smile. You can also top hot chocolate or cold sundaes with the marshmallows.
How pitiful is that? I probably got about 1/2 lb of goodies.
Storing: Keep the marshmallows in a cool, dry place; don't cover them closely. Stored in this way, they will keep for about 1 week -- they might develop a little crust on the outside or they might get a little firmer on the inside, but they'll still be very good.
Playing Around
Raspberry Marshmallows: Fruit purees are excellent for flavoring these candies. For raspberry marshmallows, you'll need a generous 1/3 cup of puree; reduce the vanilla extract to 1/4 teaspoon. After the batter is mixed, gently fold in the puree with a rubber spatula. You can use the same measurements and technique for other purees, such as strawberry, mango and passion fruit.
Cappuccino Marshmallows: Sift 1/4 cup unsweetened cocoa powder, 2 tablespoons instant espresso powder and 1/2 teaspoon ground cinnamon together into a small bowl. Stir in 1/3 cup boiling water and mix until smooth. Reduce the vanilla extract to 1/2 teaspoon, and add it to the espresso mix. After you add the sugar syrup and gelatin to the meringue, beat in the espresso mixture and continue.
Light Chocolate Marshmallows: Melt 3 ounces bittersweet or semisweet chocolate and stir in 2 1/2 tablespoons unsweetened cocoa powder. Reduce the vanilla extract to 1/4 teaspoon, and after the marshmallow batter is mixed, fold in the chocolate mixture with a large rubber spatula.
Pumpkin Spice Marshmallows: Whisk together 1/2 cup canned unsweetened pumpkin puree, 1 teaspoon ground cinnamon, 1/2 teaspoon ground ginger, a pinch of freshly grated nutmeg and a pinch of ground allspice. After the marshmallow batter is mixed, fold in the spiced pumpkin with a large rubber spatula.
Layers of white chocolate, ganache, Marshmallow Foe, and graham crackers.
A few hours later that was Red Sox Nation in the background.
Tuesday, April 8, 2008
Tuesdays with Dorie: Lemon Cream Tart
Thank you Mary of Starting from Scratch for making this week's selection.
The Most Extraordinary French Lemon Cream Tart
Source: Dorie Greenspan's 'Baking: From My Home to Yours'
1 cup sugar
Grated zest of 3 lemons
4 large eggs
3/4 cup fresh lemon juice (from 4-5 lemons)
2 sticks plus 5 tbsp unsalted butter, cut into tablespoon-size pieces, at room temperature
1 9-inch tart shell (see below for recipe)
Getting ready:
Have an instant-read thermometer, a strainer and a blender or food processor at hand. Bring a few inches of water to a simmer in a saucepan.
Put the sugar and zest in a large heatproof bowl that can be set over the pan of simmering water. Off the heat, rub the sugar and zest together between your fingers until the sugar is moist, grainy and very aromatic. Whisk in the eggs, followed by the lemon juice.
Set the bowl over the pan and start stirring with the whisk as soon as the mixture feels tepid to the touch. Cook the lemon cream until it reaches 180 degrees F. As you whisk - you must whisk constantly to keep the eggs from scrambling - you'll see that the cream will start out light and foamy, then the bubbles will get bigger, and then, as it gets closer to 180 degrees F, it will start to thicken and the whisk will leave tracks. Heads up at this point - the tracks mean the cream is almost ready. Don't stop whisking or checking the temperature, and have patience - depending on how much heat you're giving the cream, getting to temp can take as long as 10 minutes.
As soon as it reaches 180 degrees F, remove the cream from the heat and strain it into the container of the blender (or food processor); discard the zest. Let the cream stand, stirring occasionally, until it cools to 140 degrees F, about 10 minutes.
Turn the blender to high (or turn on the processor) and, with the machine going, add the butter about 5 pieces at a time. Scrape down the sides of the container as needed as you incorporate the butter. Once the butter is in, keep the machine going - to get the perfect light, airy texture of lemon-cream dreams, you must continue to blend the cream for another 3 minutes. If your machine protests and gets a bit too hot, work in 1-minute intervals, giving the machine a little rest between beats.
Pour the cream into a container, press a piece of plastic wrap against the surface to create an airtight seal and refrigerate for at least 4 hours or overnight. The cream will keep in the fridge for 4 days or, tightly sealed, in the freezer for up to 2 months; thaw it overnight in the refrigerator).
When you are ready to assemble the tart, just whisk the cream to loosen it and spoon it into the tart shell. Serve the tart, or refrigerate until needed.
Sweet Tart Dough
Source: Dorie Greenspan's 'Baking From My Home to Yours'
1 1/2 cups all-purpose flour
1/2 cup confectioners’ sugar
1/4 tsp salt
1 stick plus 1 tablespoon (9 tablespoons) very cold (or frozen) unsalted butter, cut into small pieces
1 large egg yolk
Put the flour, confectioners' sugar and salt in a food processor and pulse a couple of times to combine. Scatter the pieces of butter over the dry ingredients and pulse until the butter is coarsely cut in—you should have some pieces the size of oatmeal flakes and some the size of peas. Stir the yolk, just to break it up, and add it a little at a time, pulsing after each addition. When the egg is in, process in long pulses—about 10 seconds each—until the dough, which will look granular soon after the egg is added, forms clumps and curds. Just before you reach this stage, the sound of the machine working the dough will change—heads up. Turn the dough out onto a work surface and, very lightly and sparingly, knead the dough just to incorporate any dry ingredients that might have escaped mixing.
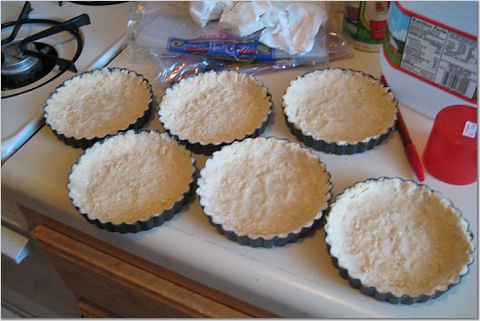
To press the dough into the pan: Butter a 9-inch fluted tart pan with a removable bottom. Press the dough evenly over the bottom and up the sides of the pan, using all but one little piece of dough, which you should save in the refrigerator to patch any cracks after the crust is baked. Don't be too heavy-handed—press the crust in so that the edges of the pieces cling to one another, but not so hard that the crust loses its crumbly texture. Freeze the crust for at least 30 minutes, preferably longer, before baking.
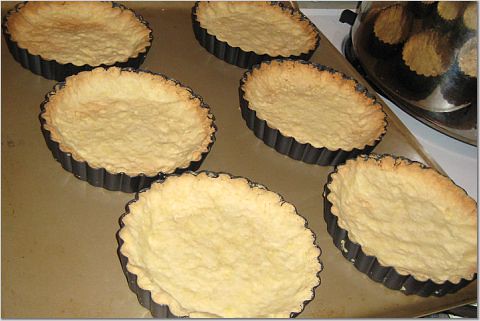
To partially or full bake the crust: Center a rack in the oven and preheat the oven to 375 degrees F. Butter the shiny side of a piece of aluminum foil and fit the foil, buttered side down, tightly against the crust. (Since you froze the crust, you can bake it without weights.) Put the tart pan on a baking sheet and bake the crust for 25 minutes. Carefully remove the foil. If the crust has puffed, press it down gently with the back of a spoon. For a partially baked crust, patch the crust if necessary, then transfer the crust to a cooling rack (keep it in its pan).
To fully bake the crust: Bake for another 8 minutes or so, or until it is firm and golden brown. (I dislike lightly baked crusts, so I often keep the crust in the oven just a little longer. If you do that, just make sure to keep a close eye on the crust's progress—it can go from golden to way too dark in a flash.) Transfer the tart pan to a rack and cool the crust to room temperature before filling.
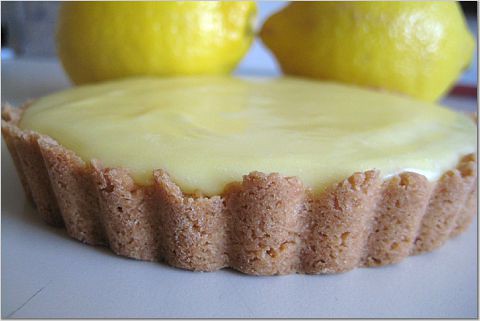
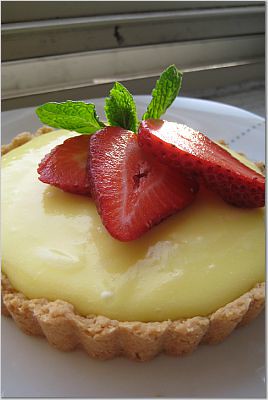
Before and after time spent in the oven.
Freshly filled with lemony goodness.

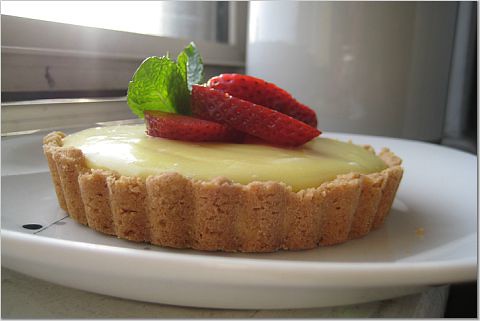
It looked too bland to me so I jazzed it up with strawberries and mint.

Much better and so eye popping.
Monday, April 7, 2008
Birthday, Part 4
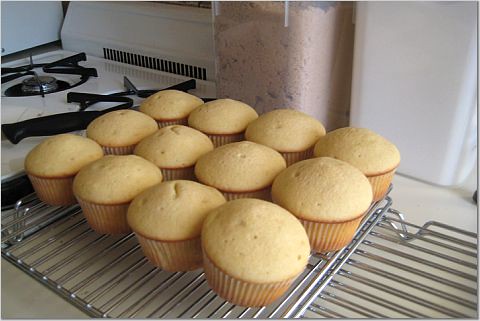
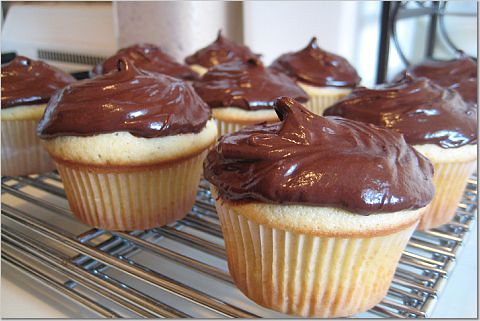
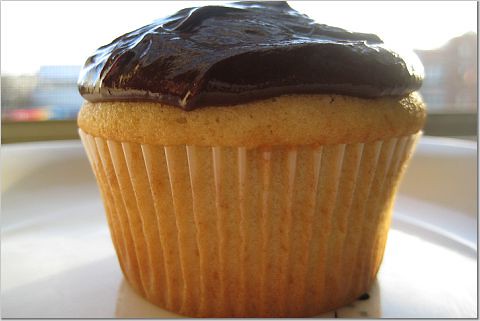
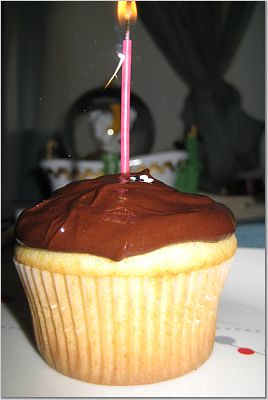
How can a person have a birthday without some kind of baked good? I already had plans to bake something when Edgar gave me some delectable sweets on my birthday. Being who I am, I decided to still bake myself something because you can never have too many sweets. I picked a recipe out of my new book. I was between white chocolate cupcakes and Kahlua cupcakes and Alex persuaded me into choosing the Kahlua cupcakes. Good choice hubs! The recipe in the book is for 2 dozen cupcakes but the recipe is easily halved. I made the ganache frosting first so that it would be chilling in the fridge while I made the cupcakes. I didn't want to have to wait on the frosting to eat one of these suckers. These cupcakes are very rich and very sinful. The alcohol taste is very subtle. You definitely won't be getting drunk off of these goodies.
Kahlua Cupcakes with Kahlua Ganache Icing
Source: Carole Bloom's "The Essential Baker"
Cupcakes
9 Tbsp unsalted butter, cut into pieces
1/2 cup granulated sugar
1/4 cup firmly packed light brown sugar
3 extra large eggs, at room temperature
1/8 cup Kahlua
1/2 tsp pure vanilla extract
1 1/4 cups all-purpose flour
1 tsp baking powder
1/4 tsp salt
1/4 cup milk
1. Preheat the oven to 350 degrees and line the muffin pan with muffin cups.
2. Place the butter in a large bowl and beat on medium speed until fluffy, about 2 minutes.
3. Add the sugars to the butter and cream together thoroughly. Stop occasionally and scrape down the sides and the bottom of the bowl with a rubber spatula.
4. One at a time, add the eggs to the butter mixture, stopping to scrape down the bottom and sides of the bowl after each addition.
5. Add the Kahlua and vanilla to the mixture and mix thoroughly.
6. Sift the flour and baking powder. Add the salt and toss together.
7. In 3 stages, add the flour mixture alternately with the milk to the butter mixture, blending well after each addition. Scrape down the sides and bottom.
8. Divide the batter evenly among the muffin cups.
9. Bake the cupcakes for 10-15 minutes or until a cake tester inserted in a cupcake comes out dry. Remove the cupcakes from the oven and cool completely.
Ganache Frosting
4.5 oz bittersweet chocolate, finely chopped
1/3 cup heavy whipping cream
1/8 cup Kahlua
3 Tbsp unsalted butter, softened
1. Place the chopped chocolate in a bowl
2. In a small saucepan, bring the cream to a boil over medium heat. Pour the cream over the chopped chocolate. Let it stand for 1 minute, then stir together with a rubber spatula or whisk until well blended.
3. Add the Kahlua and mix completely.
4. Cover the ganache tightly with plastic wrap and cool to room temperature. Chill in the refrigerator until the mixture is firm but pliable, about 1 hour.
5. Place the butter in the bowl of an electric mixture and beat on medium speed until fluffy. Add the ganache in 2 or 3 stages and beat until the mixture holds soft peaks, about 1 to 2 minutes.
6. Use a spatula or spoon to spread the top of each cupcake with the ganache frosting.
7. Serve and enjoy!
Even Perla Wants Some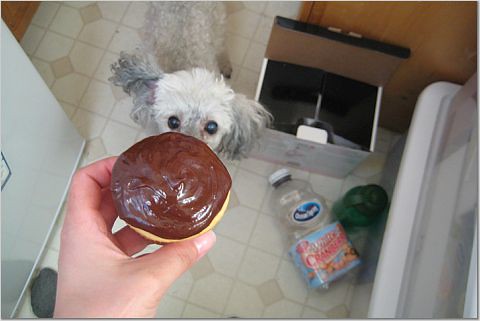
Kahlua Cupcakes with Kahlua Ganache Icing
Source: Carole Bloom's "The Essential Baker"
Cupcakes
9 Tbsp unsalted butter, cut into pieces
1/2 cup granulated sugar
1/4 cup firmly packed light brown sugar
3 extra large eggs, at room temperature
1/8 cup Kahlua
1/2 tsp pure vanilla extract
1 1/4 cups all-purpose flour
1 tsp baking powder
1/4 tsp salt
1/4 cup milk
1. Preheat the oven to 350 degrees and line the muffin pan with muffin cups.
2. Place the butter in a large bowl and beat on medium speed until fluffy, about 2 minutes.
3. Add the sugars to the butter and cream together thoroughly. Stop occasionally and scrape down the sides and the bottom of the bowl with a rubber spatula.
4. One at a time, add the eggs to the butter mixture, stopping to scrape down the bottom and sides of the bowl after each addition.
5. Add the Kahlua and vanilla to the mixture and mix thoroughly.
6. Sift the flour and baking powder. Add the salt and toss together.
7. In 3 stages, add the flour mixture alternately with the milk to the butter mixture, blending well after each addition. Scrape down the sides and bottom.
8. Divide the batter evenly among the muffin cups.
9. Bake the cupcakes for 10-15 minutes or until a cake tester inserted in a cupcake comes out dry. Remove the cupcakes from the oven and cool completely.
Ganache Frosting
4.5 oz bittersweet chocolate, finely chopped
1/3 cup heavy whipping cream
1/8 cup Kahlua
3 Tbsp unsalted butter, softened
1. Place the chopped chocolate in a bowl
2. In a small saucepan, bring the cream to a boil over medium heat. Pour the cream over the chopped chocolate. Let it stand for 1 minute, then stir together with a rubber spatula or whisk until well blended.
3. Add the Kahlua and mix completely.
4. Cover the ganache tightly with plastic wrap and cool to room temperature. Chill in the refrigerator until the mixture is firm but pliable, about 1 hour.
5. Place the butter in the bowl of an electric mixture and beat on medium speed until fluffy. Add the ganache in 2 or 3 stages and beat until the mixture holds soft peaks, about 1 to 2 minutes.
6. Use a spatula or spoon to spread the top of each cupcake with the ganache frosting.
7. Serve and enjoy!
Out of the oven and frosted.
Pretty Cupcake
Even Perla Wants Some
Birthday Cupcake :)
Subscribe to:
Posts (Atom)